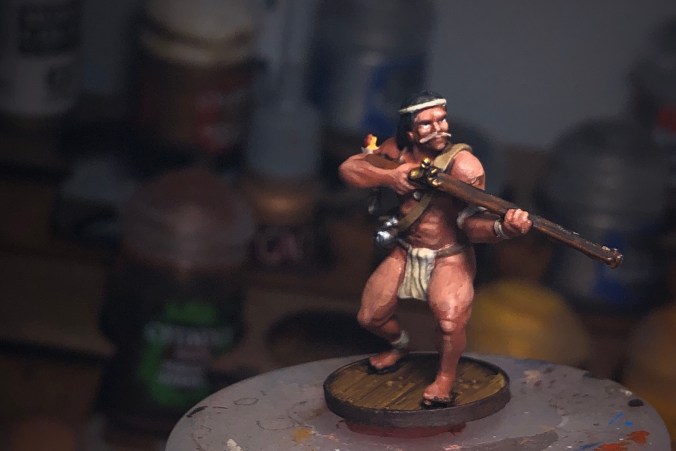
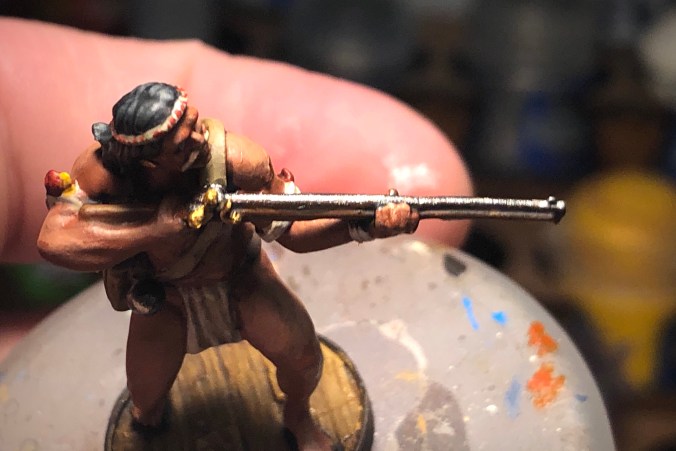
I’ve painted most of my Native models with a fairly “brown” skin tone, mimicking the Firelock promotional models. This easy Tan Earth+Seraphim Sepia paint job works fine and I did a painting guide on the Warriors using this method but this guide will be using a different set of paints with the goal of a more South American red tone to the skin areas.

I’ll be using the Foundry set of South American Flesh paints, including a shade tone, base town and a light highlight tone. I’m trying to keep the other details on these models really simple in an effort to make this guide short and simple. And in an effort to sabotage that first goal, I’m painting a Native commander with this batch of minis so I’m including him in some pictures in this post.
Step 1 – Prep and Prime
These models aren’t bad when it comes to cleaning up flash. Cutting and scraping should only take a few minutes.

The area between the rifle and body of the tall figure who’s aiming was the most trouble.

I used my standard grey/white zenithal priming method. I used Army Painter spray cans for my priming. Army Painter is cheaper than Citadel and I much prefer the texture and drying time.
Step 2 – Base Colors

This stage takes a while (for me) but I won’t take belabor this stage with too many pictures.

For basing colors I used:
- Foundry South American Flesh Shade for the skin.
- Screaming Skull for the loincloths, leg and arm wraps, hair ties and headbands. (You could do a lot of variation here which makes them more interesting but I chose to keep it simple.)
- German Grey for the hair.
- Leather Brown for waist cord, one head band, knife handles, and necklace cord.
- Mournfang Brown for the muskets.
- Cavalry Brown for some feathers and the loincloth and “leg warmers”for the commander.
- XV-88 and Rhinox Hide for the bases.
- Zandri Dust for the satchel.
- Steel for the most of the musket hardware and the “powder balls.”
- Brass for some musket details and the hat and decorations on the commander.
- Ivory, Averland Sunset, Cavalry Brown, Mephistopheles Red, Sick Green and Thousand Sons Blue for the various feathers.
- Dryad Bark and Rhinox Hide for the commander’s club.

All based.

They’re coming to life!

The skin and Cavalry Brown have very little contrast right now, but that will change when I highlight.

Step 3 – Washes
With most of the model being some shade of brown, this step is fairly simple. Simple enough I forgot to take any pictures!
I used straight Agrax Earthshade for the base, muskets, shoulder bags and all the brass accessories on the commander.
I used straight Nuln Oil for the black hair and Steel bits. For all the feathers, loincloths and arm and leg bands, I used a mix of Agrax Earthshade and Nuln Oil diluted with a medium or water.
I wanted to try to paint all the skin areas without a wash, but I experimented at this point and put that diluted Agrax/Nuln Oil wash over two of the models and as I got towards the end of the process, I wish I had done that to all of them, so I would encourage you to put that wash lightly over the entire body of the models.
Step 4 – Highlights
But before the highlights I do the optional eyes. Vallejo Ivory for the whites. Slide your smallest brush into the eye socket from the side, parallel with the front of the face for the best result. You can always touch up with flesh tone.

And a tiny dot of German Grey for the pupil. This is the hardest part for me. Use a size 0 or smaller brush if you have one!

Next I did several layers of highlighting over all the flesh. Again, I’m using the Foundry South American Flesh trio of paints. I based with the Shade tone and now I’m using the base color for a heavy highlight and then the Light 119C for the brighter highlights.

I find these paints a little more difficult to work with than Vallejo or Citadel. They are hard to blend layers on top of each other so you’ll see some harsh lines in my work that I didn’t do a good job of disguising.

Before the highlights

After skin highlights

No highlights on the Left, layers of highlights on the Right
The commander model has nice contours that lend themselves to easy highlighting. Those abs!

You can see the brighter highlight is very opaque and doesn’t layer particularly well. I will put a wash/glaze over the flesh area later which will help a little.

Next I highlighted the hair using the original German Grey lightened with increasing amounts of Citadel Dawnstone but you could just lighten the German Grey with tiny bits of a white or cream color and it would work.

I didn’t push the hair highlights very far because I’ve overdone it and wished I had stopped sooner.

The loincloths and arm and leg bands are highlighted with the original Screaming Skull and the Ivory for the brightest areas.

I did some research on South and Central American Natives and it looks like plain white or more likely un-dyed was the most common material they used for everything.

Check each model over twice as you highlight the whites. There’s a lot of arm and leg bands and they’re easy to miss!

You could leave these fairly dark for a dirtier look or brighten them up with a lot of Ivory for a cleaner more high-contrast look.

I did simple highlights on the shoulder bag with the original Zandri dust and then Karak Stone.

I guess you could paint the button a different color as well but I didn’t.

The reds are interesting! I mixed some Evil Sunz Scarlet into Cavalry Brown right away to start highlighting the commander’s clothes.

I used straight Evil Sunz Scarlet for the highlights on the red feathers. There isn’t room to do “layers” so I just use the bright highlight tone to give the feathers some texture.

I worked up to a pure Evil Sunz Scarlet on the loincloth and it worked fine. I like the richness the Cavalry Brown base provides. But maybe I should have used a brighter red base tone for the feathers so it was more different than the cloth.

Next I gave all the rest of the feathers some highlights and texture.

The red feathers got Evil Sunz Scarlet and Wilder Rider Red, the blue got Temple Guard Blue, the Green use the original Sick Green, the yellow got Yriel Yellow and the Ivory feathers got pure White highlights.

I like how the feathers came out on this kneeling model.

I wasn’t particularly pleased with some of the feather color combos I ended up with on some of these models.

Next I worked over the guns and metallics.

For the musket wood I used the original Mournfang Brown and Skrag Brown.

For the musket barrel and other steel bits and the powder ball thingy, I used Metal Color Dark Aluminium and the Duraluminium. These Metal Color Paints aren’t cheap, but they are far and away the best metallics I’ve ever used.

For the Brass bits on the muskets (I painted some of the locks brass and along with the pieces that secure the ramrod on the underside of the barrel with Brass) and all the metal ornaments and hat on the commander with Game Color Polished Gold.

The model on the Left had a wash applied to the skin before highlights while the model on the Right did not.
At this point I was almost done but I wasn’t thrilled with my skin in general. I had done a wash on some of the models but not all as an experiment and I decided I wanted to go back and use a wash to smooth out some of the highlights and give some more depth to the skin tone in general. If you did a wash over all the flesh, you might need to do this again, but I think it worked well as a glaze to smooth out the highlights and I would encourage you to do a lightly applied wash over all the skin again if you have any areas that look a little jarring or splotchy.

These are looking pretty good but I’m going to do that wash over the bodies again anyway.
I mixed up another batch of Agrax Earthshade with a bit of Nuln Oil then thinned with a good amount of Lahmien Medium and applied it all over the bodies.

I applied it fairly lightly for a wash, not letting much pool in the recessed but treating it more like a glaze over the skin.

When it was dry I went back with the brightest skin paint and lightly brightened the highest areas with thinned paint so I didn’t get those harsh transition lines.

I was much happier with this result.

Painters with more skill than me could make these flesh highlights much more realistic.

Next are tattoos! These are fun but take a steady hand and some time. Take your time because it isn’t easy to touch up mistakes at this stage.

I copied some of the tattoos from the Natives in the rule book and tried to do some online research for some more ideas but I didn’t come up with much

Many of the tattoo patterns I found online were very intricate but at this scale, I went with basic patterns and lines.

If you hadn’t noticed yet, I’m painting a fifth musketeer in this batch. Two copies of the standing/aiming model.

These X patters are taken straight from the rule book.

I took some extra time on the commander’s tattoos and I felt pretty proud of them when I was done.

I found loading your brush with the right amount and thinness of paint was crucial while doing this freehand work. It needs to be pretty thin.

These huge thighs are a perfect canvas for some tattoo work.

I copied the tattoo on the lower left arm from the rule book as well.

These models just need a coat of protective spray and they’re finished!

The protective spray was still a little fresh on these models when I took these pictures so they have more of a glossy look than they should. When fully dry, they have a nice flat finish. I use Testors Dull Coat Clear Varnish spray.
Now let’s compare these minis with the other Natives I painted with the Tan Earth/Seraphim Sepia.
I think I like this darker, pinker look but I’m not educated enough to really say which is more accurate. I guess with all the areas and tribes represented within the several Native factions represented in Blood and Plunder, either tone could be correct.

Foundry South American Flesh paints on the Left and Tan Earth/Seraphim Sepia paints on the Right. If you prefer the Tan Earth look, I created a painting guide for the Warrior models which you can find here. You can find the set of Foundry Paints I used for this set here.

I previously painted up some Young Warriors with these Foundry paints so I have a nice little force with this skin tone now.

All my Native commanders. These two skin tones look great by themselves but they look a little jarring when put together. The Tan Earth minis look green and the Foundry paints mini looks burnt in this picture.
Pingback: The Iroquois - Blood & Plunder Faction Review - Blood & Pigment