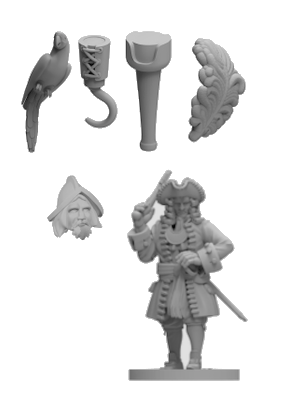
The Blood & Plunder 2-Player Starter Kit: Blackbeard vs Maynard is a MASSIVE starter set. It comes with 24 sailor miniatures (and 2 commanders!) and lots of weapons and options that can be overwhelming for new players. This guide is designed to help you get started with the Blood & Plunder starter set. It contains suggestions for how to build the models by Nation and what weapons work best.
Background and Initial Thoughts
Initially, I was skeptical about the switch to plastic miniatures due to concerns about added work and time. I hesitated before backing the Blood & Plunder Kickstarter, questioning whether I wanted to take that step. I’ve assembled a thousand+ models in other games and I wasn’t looking forward to doing it with this one. I liked that Plunder has single-piece sculpts with no assembly and it was one thing that drew me to the game. However, the promise of superior detail compared to standard sculpts and the flexibility of poses convinced me to take the plunge.
Having now assembled 200+ Blood & Plunder plastic miniatures, my perspective has shifted significantly. Rather than being tedious, I’ve shockingly found the process enjoyable, especially as I delved into creating my own custom designs. This experience has inspired me to share what I’ve learned in this article to assist others in their miniature-building endeavors.
Moving from Metal to Plastic
Transitioning from metals to plastics may seem daunting if you’re not accustomed to working with plastics. Initially, it might feel like a chore, but don’t give up. After assembling a few sprues, you’ll find your rhythm, and hopefully, your creativity will kick in. Once you are a few sprues in you’ll hit your stride and hopefully, the creative juices will start flowing… heck, it might even start to be fun.
- Before you Begin
- Recommended Tools
- General Assembly Tips & Suggestions
- What Weapons Should I Take?
- Personal Recommendations for What to Build By Nation
- Converting a Two-Handed Plastic Miniature to a One-Handed Model
- Cannon Crew from Militia & Sailors Models
- Cannon Crew from a Box of Plunder
- Box of Plunder Casualty Marker … Resurrection
- Drummers from the Box of Plunder
- Box of Plunder Custom Commander
- Bermuda Sloop Assembly Tips
- What do you do with the extra bits?
Enough rambling…. let’s get to it. Below are some recommendations for tools and general tips, and suggestions for assembling your new Raise the Black minis. There are also several pictures from me and community members for inspiration in creating your own unique minis.
Before You Begin
Figure out a plan for what you want to build. Are you just building things because you want cool looking pirate minis for D&D or another game or are you building for actual gameplay in Blood & Plunder? What Nation do you want to play? Is there a playstyle you like better (melee and boarding, cannons and big guns, small arms & muskets, etc)?
If you’re not sure what the Nations are or the play style of each, you may want to pause and check out our guide to getting started for Blood & Plunder. That guide will help you get familiar with the game and the basics. It’s easy to get excited and jump in and build a bunch of cool minis only to find out the weapons don’t match what you need or you have a few odd minis that don’t quite go with anything.
Recommended Tools
If your completely new to the hobby there are a some
Hobby Tools Set

There are LOTS of options for tools, but this is a great starter set of tools for gamers new to the hobby. It includes a set of clippers, a hobby knife, some files, and tweezers in a handy storage case for only $12. The quality won’t be the same as the ultra-spiffy Games Workshop products, but you can’t beat the price! These tools will be very useful for assembling plastic models.
At minimum, you need a hobby knife/X-acto blade tool to get the parts off the sprues. And if you have fat fingers like me, get a pair of tweezers from the local dollar store.
Clippers

All of the new plastic miniatures for Blood & Plunder are printed on model kits with dozens of little bits to snip free. You can use a hobby knife to cut them free but that can bend or break some of the finer more fragile pieces. A nice set of flush cutting clippers is highly recommended, It will save you the time of having to trim as much of the connector bits off. If you don’t need the full kit above, you can get an average set of clippers for $10 or less. But since other members of the Pigment team swear by them, I have to plug the best of the best… the oh-so-nice Games Workshop set for $30. If you have the money, they are allegedly worth it. I make it through with my cheap set, a hobby knife, and filing down the bits like a common plebe.
Tamiya Plastic Cement


Tamiya Plastic Cement is like liquid gold. If you love superglue and the fun of getting it everywhere, then keep using it. But if you would rather like not have your fingers covered in glue/melted skin afterward, this is the BEST product ever!
The top screws off to reveal a small brush like nail polish. Paint the liquid on one side and slap the parts together, and they bond relatively quickly. You can slide them around a bit, but in just seconds, they will begin to bond tightly. It is DEFINITELY worth picking up some Tamiya Plastic Cement on Amazon or your local hobby shop (if they carry it). I prefer the standard, but some folks swear by Tamiya Extra Thin Cement, which is thinner and creates cleaner joints, but is not as strong.
A Cutting Mat or Cutting Board

You’ll be doing a LOT of cutting and trimming while removing the bits from the plastic sprues. You can use any standard cutting board from a kitchen if you’d like. Or I really love and recommend a “self-healing” cutting/sewing mat. If you’ve not seen these, they are great for hobbyists. They are made of some PVS material imbued with magical properties that make them resistant to cuts from hobby knives. You can slice and dice to your heart’s content, and they resist the damage.
They also have a grid and measurements built into them, so if you build your own terrain or cut your own sails, they are super handy. You can get a large self-healing mat on Amazon for c. $10-12. Alternatively, your local Dollar Tree may have a small 9″ version in the craft section for $1.25-3.
General Assembly Tips & Suggestions

- Do not… I repeat, DO NOT cut all the bits of the sprues and just go at it. The parts are not 100% interchangeable across minis. Once you have them off you will lose the references to the part numbers for assembly which is frustrating.
- Dry-fit everything as you go, BEFORE putting glue or cement on. It’s easy to think you know how parts align, only to be wrong and flounder a bit.
- Glue the legs to the torso first. Then glue the miniature to the base so you have something else to grip while working with the rest of the model.
- Hats are NOT 100% interchangeable. Several minis have “knobs” on their heads you can remove to help them fit, but even then sometimes the contour of the heads doesn’t line up. It will take a little more work, but you can still swap things carefully.
- If you assembling models with two-handed muskets or other weapons, don’t glue one arm and one hand and let it dry before doing the other. The alignments aren’t perfect, so you will have to do a juggling act and glue both shoulders and the hand at the same time to make sure you can align everything properly. This is another reason the Tamiya plastic cement trumps superglue. You have a longer work time and it doesn’t stick to your hands.
- If using boarding pikes you want to make sure your mini is on the base before putting the arms on and weapons in their hands.
- his It will keep you from accidentally gluing arms and weapons in positions that are too low to fit the spear above the height of the base.
- Having the base in place allows you to rest the bottom of the spear on the base for added stability.
Instructions and Tracking Sprue Contents
- The instructions aren’t great, especially with two-handed weapons since they don’t work with just any pair of arms. You really have to pay attention to the angle of the wrists attached to the hands on the weapon relative to the front of the arms. Again, dry-fit eveything before putting glue on anything.
- Look at the buttons/cuffs on the arms to know which pairs go together.
- As you are assembling your minis, write notes on your instructions. Write the letters “A”, “B”, and “C”, etc near each of the parts in the sets that you are using when putting the specific model together. Since you have 4 sprues of minis, it will help you keep track of which bits you’ve already used in the past so you don’t make a bunch of duplicates. If you end up buying more minis later this gives a handy reference for long-term.
- If you managed to lose your instructions, the assembly instructions for all of the plastic minis are available as a free download in the Firelock Games DLC section.
- If you are curious about the parts available in the misc kits, you can get a full breakdown of what is on each sprue in our Complete Guide to Raise the Black Plastic Miniature Sprues.
What Weapons Should I Take on the 2-Player Maynard & Blackbeard Starter Kit?

Assembly tips and Weapon Style s for Blood & Plunder starter kit:
- In that time period, there wasn’t a massive difference in uniforms for sailors (mid to late 18th-century formal uniforms begin to appear). Some people will do the larger floppy or tricorn hats for the British and the plainer hats for pirates. But it doesn’t really matter. For long-term play, you will likely mix and match sailors into other factions so don’t stress over it. In naval games, your ships provide the “teams” so you don’t have to sweat the style or paint scheme.
- Pg 137 in the rulebook has a good scenario for “BLACKBEARD’S FINAL STAND” that works well for demos and learning to play. This scenario comes with force lists that identify the units for you.
- The biggest issue is the weapons. It typically doesn’t matter in a friendly game what weapon a model is using, but in tournaments, it’s typically preferred the model looks close to the unit’s function. Models with pistols imply closer range/melee-focused units, muskets imply longer range fire,and lances/pikes have special abilities. I’ll cover that in depth below.
What Weapon Types Should I Take?
This is a high-level overview of what to take and how they fit into the game in general. If you want specific weapon recommendations by Nation/Faction, they are coming right after this segment. Every Nation has some form of “Sailor” model that can be used in the gam,e so there is a bit of variety based on Special Abilities, but for the most part, the weapons are similar.
Ranged Weapons
- Pistols – Pistols are key for Pirates, both Roundsman and Pirates models sport “Brace of Pistols,” meaning each model has two or more. Sea Dogs, Marins, or Marineros use just one pistol. Each sprue contains 13 pistols (9 in hand, including one clubbed, and 4 loose), accommodating 6 models, resulting in 2 pistols each with 1 extra. Additionally, I’ve customized some models by adding pistols from other sources or integrating them into specific commanders and fighters for added flair.
- Muskets– 1-2 musket Units are common in nearly every force. Normally, for new players, I recommend the 2-player starter AND 1 Militia box and or 1 Soldier box. If this is your only purchase, I recommend AT LEAST 8 musket models. If you buy the Militia and/or Soldiers that will give you plenty of musket-wielding models for other units, so you may only want to use 4 muskets from the Sailors so you have an even 16 (12 from militia + 4 sailors = 2 Units of 8 muskets).
- Blunderbusses – Blunderbusses, shorter muskets akin to era shotguns, are included in the starter set (P34). Utilize all 4 unless you prefer to save them for upgrading other models. If you desire more, you can create a proxy blunderbuss by shortening the barrel of a musket.
- Explosives – The instructions show the bag of explosives (P50) and a hand with an explosive (P51) as pairing body A1, but they can be used with any model without modification. They represent Stinkpots, Firepots & Grenadeos, common upgrades for various Unit Types. As you move beyond the starter box, these special weapons become more prevalent. It’s highly recommended to use this option on at least 2 models. Extras can upgrade Militia or Soldier kits, that lack explosives.
Melee Weapons
- Swords & Axes – These are both Standard Melee Weapons, with no rules difference between them. EVERY model needs at least one melee weapon in their hand, on their belt, or on their back. I like to pair my axes with models that have blunderbuses or explosives to help them stand out as different.
- Pikes – If the starter is your only B&P set, I’d hold off on pikes unless you’re playing Spanish or using them as standard melee weapons—you likely won’t need them for a while. I love their look and built a full unit of Lanceros, but with hundreds of models, I can spare a few that mostly sit in storage. Pikes aren’t common at sea, and on land, players rarely field more than one unit (except for Natives and Spanish). You can swap pistols for lances on many sailor units, but if you’re not buying other kits, just adding 2–4 can represent the unit if you clarify with your opponent.
- Melee Only – Multiple units allow you to take a -1 to the cost of the unit to lose your pistols or muskets for a Melee-only option. This is a go-to suggestion for ship cannon crews to get cheaper units with more bodies. Having a unit of 4 with just melee weapons is a solid choice and frees up pistols for your other models.
How Many of Each Type Should I Make?
- The starter scenario has several units of 4 models. But for the average unit size, 6-8 models are the most common in games of 150 pts or less. Games of 200-300 pts will have 8-12+. So cluster the weapon types in sets of 6-8.
Personal Recommendations for What to Build By Nation
There are LOTS of ways to build your Sailor models. I wouldn’t get too stressed out on how you build them, but IF you prefer specific answers, this is my personal recommendation for how to build the 2-Player Blood & Plunder Starter Pack Sailors. These suggestions are meant to help keep the national flavor of your units.
The recommendations are based on you splitting a 2-player starter and getting 2 Sailor sprues (12 models). If you are keeping the entire box for yourself, it still works, just double the recipe. With all 24 models to play with, you may want to swap heads between minis and poses to make them a more motley crew.
Recommendations per 12 models:

British
- ALL models with a Melee weapon
- 3 Models with Melee Weapons only (cannon/swivel crew)
- 3 Models with a Pistol
- 1 Model with a Pistol & Explosives
- 1-2 Models with a Blunderbuss
- 3-4 Models with Muskets
- Use the tricorns and non-floppy hats with the ponytails and ribbons first. Bandanas and knitted caps.
- Use Sea Dogs as inspiration.

Pirates
- ALL models with a Melee weapon
- 4 Models with 2 Pistols
- 2 Models with Pistols & Explosives
- 2 Models with 1-2 Pistols and a Blunderbuss (you can put explosives and blunders on the same model!)
- 4 Models with Muskets
- Use the non-tricorn hat heads first, but mixing some in is fine. Any bandanas and knitted caps.
- African heads are more common than the other nations.
- Use any nation’s sailor models as inspiration.

French
- ALL models with a Melee weapon
- 4 Models with Melee Weapons only (cannon/swivel crew).
- 2 models with a Pistol
- 1 Model with a Pistol & Explosive bag and explosive in hand
- 1 Model with a Blunderbuss
- 4 Models with Muskets
- Favor Bandanas, wool caps, round or floppy hats preferred and then anything else sparingly.
- Use the Marins as inspiration.

Spanish
- ALL models with a Melee weapon
- 4 Models with Melee Weapons only(cannon/swivel crew).
- 3 models with a Pistol
- 4 models with Muskets
- Use any hat but the tricorns. Floppy hats, bandanas, and wool hats are preferred.
- Use the Marineros as inspiration.
- If you plan to play a lot on land or keep the full 2-player set for yourself, you may want to swap 4 Muskets for Pikes and buy a 4pk of Lanceros to have a full 8-man unit.

Dutch
- ALL models with a Melee weapon
- 4 Models with Melee Weapons only
- 4 Models with Pistols
- 1 Models with a Pistol & Explosives
- 2 Models with a Blunderbuss
- 0-1 Musket and use a Militia kit to build units similar to European Sailors or Kapers.
- Wool hats, bandanas, or smaller round hats are preferred (use floppy hats and tricorns sparingly).
- Use the Zeelieden and Enter Ploeg as inspiration.

Unaligned
These are extremely varied, so there isn’t a top recommendation. A blend of the British and Spanish will likely be what you need for most European factions.
Natives
- Sorry… but you bought the wrong starter for Natives.
- For a North American style, get the NORTHEASTERN WOODLAND TRIBES FACTION SET.
- For a Central or South American flavor, get the Native American Nationality Set.
- Get 2 Piraguas or 3-4 Birchbark Canoes (Northeastern) or 3-4 Canoes (Central/S. America)
Converting a Two-Handed Plastic Miniature to a One-Handed Model
In addition to the 2 Player Blackbeard and Maynard starter set, I 100% recommend you get 1-2 plastic Militia boxes. These pair VERY well with the Sailor sets and are great for adding some variety to your forces. They work for any nationality (except Natives). For more specific suggestions, check our article on What Should I Buy After the Blood & Plunder Starter Box?
Using the Sailor Weapons with Militia
Even though 100% of the Militia have both hands on their muskets out of the box, they aren’t “stuck” there. With a few shoulder and arm cuts, you can mix and match arms with the extra Sailor arms to create totally new models! Here are a few Militia Models with pictures from the Firelock Games box image comparing the modified outcomes.
Below is a Militia Model with bits from the Sailors set: Sailor arms, a musket, an explosive bag, and explosive in hand.


Again, swapping the arms with extras from the Sailors ki,t I converted the two-handed weapon pose into a dynamic model ready for melee with a sword and boarding axe from the Sailors. I trimmed off the hands from one of the buccaneer guns and slapped it on his back shoulder strap.


This is another quick conversion using a one-handed Sailor musket (P41) and arms to add some variety to the militia.


Cannon Crew from Militia & Sailors Models
If you swapped out arms in some of the above builds, you’ll have Militia Boxed Set arms D4 and E1 both open palms. So…you can then take the extras arms and put them on Sailor bodies. Use some air-dry clay to sculpted a small ball to put in the open palm and “boom!” you have a new Cannon Crew member. You can also pair them with the cannonballs from the Box of Plunder (a special Kickstarter item) or roll a stack of your own cannonballs for effect.


Cannon Crew from a Box of Plunder
Using the Box of Plunder you can combine the bit with the Sailors and or Militia minis to make a new cannon crew with a little more variety and flexibility.


If you got the Kickstarter Box of Plunder and use the B1 or C1 Sailor body you can position an arm with the linstick in a way that looks like he is lighting a cannon.


I call this one my Tusken Raider Cannon Crew member. I cut the ramrod stick to make it work for a double overhand taunt
It also works for a “YOU SHALL NOT PASS!” option if your cat decides to interrupt the photo shoot.


Box of Plunder Casualty Marker … Resurrection
The Box of Plunder has several casualty markers included on the Sprue. These are things you can add to the battlefield for extra “flavor”. But they can also be interactive as “loot” or objective markers. Guy Rheuark put together some rules for adding them to your game: Tokens of the Dead – Casualty Marker Rules for Blood & Plunder.
There is also a creative use for them as actual functional models. On at least one of the models, if you trim the feet or hit them with a heat gun you can bend them flat so the model is capable of standing up. Then you can swap his raised hand with one from the extra Sailor bits. I put a Blunderbuss in the hand of the model below since it pairs well with the bag of Grenadoes already on the model. This lets the mini work as a Sailor Weapon Upgrade or possibly an Enter Ploeg model.
In the image on the right below, the arms and head were cut and swapped with extra bits. The legs were cut at the calves to rotate them to the front.


Drummers from the Box of Plunder
The Box of Plunder that came with the Raise the Black Kickstarter pledges (which is also in the Port Royal Start Box) has a 4 part drum that can make a model into a Musician or new Drummer Boy Character model.


Box of Plunder Custom Commander
Not specific to the 2 player starter, but worth an honorable mention is this example of a customer Spanish Commander by Tyler Carlson. A picture of the bits is on the left, with the final outcome on the right. You can view some of Tyler’s other minis on Instagram @cherry_picked_miniatures.


Posing the Leaning Sailor Models
Unfortunately, two of the Sailor model poses are awkward and stick out from the rest with their hunched-over/leaning pose. One in the set would have been tolerable, but there are two. It can be a bit hard to pose them naturally. I’m not the best at it, but here are a collection of poses from the “leaner loadoats” that might give you some inspiration or ideas to hide them among the others.


Bermuda Sloop Assembly Tips
The Bermuda / Baladra Sloop is the first fully plastic ship model produced by Firelock Games. It’s a gorgeous model with even more detail than Firelock’s already top-notch models. The sloop goes together quite nicely as a whole. The parts all fit snugly and tight with no cutting/trimming needed.
Blood & Plunder 18th Century Plastic Sloop Building Guide
We have a full-length YouTube video assembly guide. for the new Plastic Sloop.
Tips & Suggestions for Assembling the Sloop
That said, here is a quick text version of a few “gotchas” or confusing bits in the instructions on your first ship.
- Once you glue the rear deck on, you can no longer fit fully assembled cannons in the rear gun ports. There are a few options here:
- prime, paint and prep your cannons and glue them in place on the rear deck before closing it off.
- Leave two of your cannons off the wheels so you can fiddle them in place after the fact. You can glue a chunk of sprue to brace them at the right height if needed.

By default, this is meant to be an optional choice, not a BOTH. So you need to pick windows or a nameplate as they won’t both fit on the stern. Unless of course you do what Ryan Peterson has done and chop the nameplate like this:


This weird-looking thing is a “bilge pump”. It’s designed to pump water from the lower deck over the side of the ship. It’s completely optional and you can add it anywhere on your deck if you want it on your ship.

It should be evident, but make sure you do the steerage first (green circle). Putting the back deck (yellow) in place first makes it a bit of pain once the sides of the hull are together. It is doable but you kind of have to sliding it in sideways and then rotate it in position. Do it early and save yourself the trouble.
On the first ship, I put the bottom hulls fully in place and moved on. When I came back to try to put the rear deck on I cracked part of the glue trying to get the deck in place.
The Rear Cannons are a Pain in the Rear
There are two gun ports at the rear of the ship that are on the lower deck. They aren’t shown in the instructions so if you fully assemble the ship, you literally can’t put them on the model because they don’t fit through the gun ports.

Alternative Rear Gun Solutions
If you missed it like I did the first go-round here are some alternative Solutions:
- Don’t assemble all of the cannons. Leave two separate and just use the guns. I cut two small pieces of foam (or cardboard) narrow enough to fit through the gunports and glued them to the ship deck. Then I glued the cannon barrel on top. At a distance with the darkness of the hull, you’ll never know.
- Don’t worry about it and glue the gunport doors on the rear deck closed. Just tell your opponent what your ship’s armament is at game time.
- Don’t sweat it. Leave them empty. Gluing them in place can be deceptive anyway because you may or may not have the guns on your ship at game time and you’ll have to tell your opponent what you are running anyway.
What do you do with the extra bits?
As you assemble your minis you will end up getting extra bits from the unused pieces. This will give you more bits and weapons than you have models to use them on. So what can you do with the extra bits?
- Add some extra weapons to other metal minis you may already have to create some variety.
- Use them to make objective markers for things like weapon caches or loot piles.
- The weapons can be arranged on weapons racks for display.
- They can be turned into terrain bits of discarded weapons or blood bits from a gruesome battle
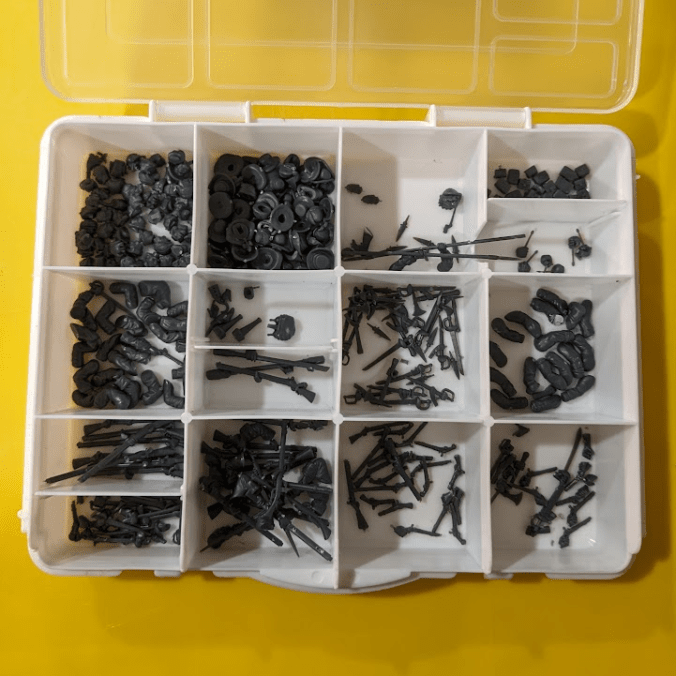
Storage Suggestions for the Extra Bits
Some folks dump all their bits in baggies. Some leave them on the sprue until they are ready to use them. I opted to buy a small craft storage box from Dollar Tree for $1.25. I sorted my extra bits with a slot for heads, hats, left arms, right arms, two-handed weapons, melee weapons with no hands, etc. It’s a quick and easy way to keep them separated to find the bits you need later. Whatever solution you go with, make sure it has a tight lid so that it doesn’t pop off and unleash the tears of shame. You also want to make sure the dividers go all the way to the lid so that if you flip it upside down the bits don’t mix.

Written by Jason Klotz
Additional Content Suggestions
- How to Make an Easy Long John Silver Blood & Plunder Mini – a great kitbash from the new plastic minis.
- Complete Guide to Raise the Black Plastic Miniature Sprues – Full breakdown of all the bits on every sprue
- What Should I Buy After the Blood & Plunder Starter Box?
- 18th Century Sloop Building Guide Video for Blood & Plunder
- See some of finished and painted pirates from the Blood & Pigment Crew: Sailor Models Showcase – Painted Blood & Plunder Miniatures
- Learn how to build a custom Benjamin Hornigold kitbash model
Product Recommendations
If you have yet to pick up some of the new plastic miniatures, here are a few quick links to get some from Firelock Games directly.
Great tips! I will definitely pick up one of those craft organizers next time I’m at dollar tree.
Pingback: Tyler Carlson - Blood & Plunder Player Spotlight - Blood & Pigment
Pingback: Using Blood & Plunder Pirate Ships in Dungeons & Dragons
Pingback: Raise the Black Preview - New Ship Upgrades - Blood & Pigment
Not to be “that guy” but if you want actually good clippers, don’t get GW. They are just marked up, rebranded normal clippers. The actual best are God Hand nippers: https://www.amazon.com/God-Hand-Spn-120-Ultimate-Nipper/dp/B008S51O22