
Here are five new fan-made Sea Scenarios for Blood & Plunder. Each is a little more complicated than the Scenarios found in The Blood & Plunder Core Rulebook, and will test your crew’s sailing skill and your commander’s determination. In each Scenario you will also find two Optional Rules that change how the scenario plays. Discuss using either one, or both, with your opponent before trying out the Scenario.
I have also included, at the end of this article, the Alternative Reef Region Rules, or ARRR. This is a new way to determine how much Shoal terrain is used in a Blood & Plunder sea game. These rules work with the five new sea Scenarios, and all sea Scenarios in the Core Rulebook and No Peace Beyond the Line. To use the Advanced Sea Terrain Placement Rules you will need at least four Shoals, and two Sandbars or islands. Joseph wrote a great article about making Shoals that can be found here. If you do not have any Sandbars or islands, you can represent these by placing palm trees on a Shoal.
Blood & Plunder Sea Scenario 1: Anchored
The Attacker has ambushed the defender while they laid at anchor along the coast. As the Attacker slowly approaches, an alarm goes up on the Defender’s ships.
SETUP:
The whole board is considered Deep Water, with any additional water terrain added at the discretion of the players.
The Defender picks a board edge. This board edge is near the coast and impassable.
The wind starts from the board edge opposite the defenders board edge.
SCENARIO RULES:
All of the Defenders ships are deployed anchored. The Attackers ships are deployed at their lowest sail setting above 0″, or 0″.
The map may be scrolled, but not towards the impassable edge.
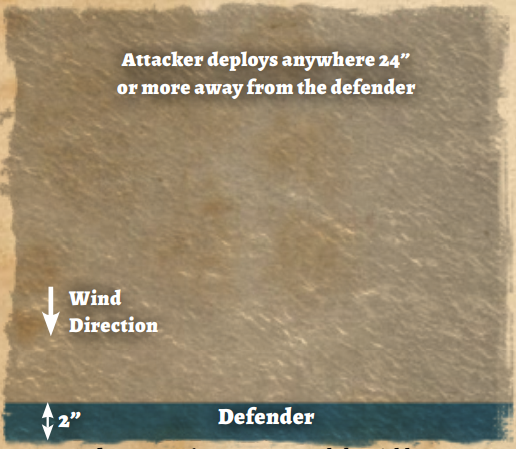
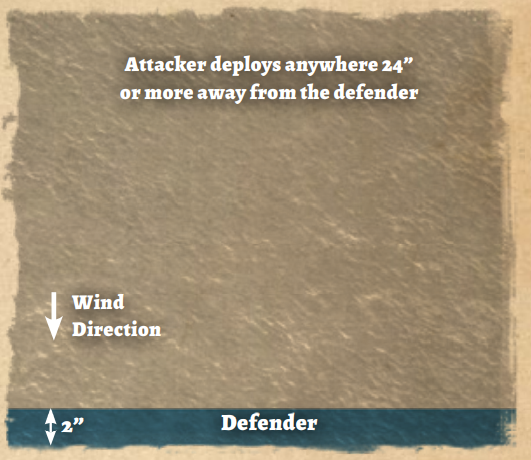
DEPLOYMENT:

The Defender sets up within 6” of their board edge.
The Attacker sets up anywhere at least at least 24” away from the defender, and cannot deploy windward.
OPTIONAL RULE:
Dusk: Use the Sunset Limited Visibility rule, starting at 28″ of visibility
GAME LENGTH:
Six turns.
OBJECTIVE:
>> Defender gains a strike point if the Attacker has a unit on the defenders flagship.
>> Attacker gains a strike point after turn 3 and later if the Defenders flagship is at its max sail setting and sailing large.
Blood & Plunder Sea Scenario 2: Chases End
Blood & Plunder Sea Scenario 2: Chases End
With dogged determination, the Attacker has pursued the Defender for a day and a night. Even though both crews are tired, all hands gather on deck and prepare for battle, and end this chase.
SETUP:
The whole board is considered Deep Water, with any additional water terrain added at the discretion of the players.
The wind starts from the board edge opposite the defenders board edge.
SCENARIO RULES:
At the beginning of the battle, each unit must make a resolve test on two d10’s. For each failed die, the unit gains one point of fatigue. This roll is after and in addition to any resolve test from Terror or a Musician, but do not give any unit more than two fatigue total.
DEPLOYMENT:
The Defender picks a board edge, and sets up their ships so a part of the ship is within 2” of the deployment edge.
OPTIONAL RULE:
Very Tired: Any unit that pushes receives two fatigue instead of one. If this would make the unit shaken, it may not push.
Morning Meeting: Use the Dawn Limited Visibility rule.
GAME LENGTH:
Six turns.
OBJECTIVE:
>> Attacker and Defender gain a strike point at the end of turn 3 and later if half (rounded down) of their units have two or more point of fatigue.
>> Attacker and Defender gain a strike point for each character that is removed as a casualty.
Blood & Plunder Sea Scenario 3: The Worsening Storm
Blood & Plunder Sea Scenario 3: The Worsening Storm
Two ships meet while fleeing a storm front, and recognize each other as enemies. Now, each commander hopes to sabotage the other’s survival, while still preparing for the ongoing storm.
SETUP:
The whole board is considered Deep Water, with any additional water terrain added at the discretion of the players.
The wind starts from a short board edge, if playing with a short board edge, or any board edge if not playing with a short board edge.
SCENARIO RULES:
Choose the Original, Tropical, Temperate Climate, or Cold Weather Chart. At the end of the first turn, third turn, and fifth turn, before drawing activation cards, increase the weather by +1.
DEPLOYMENT:
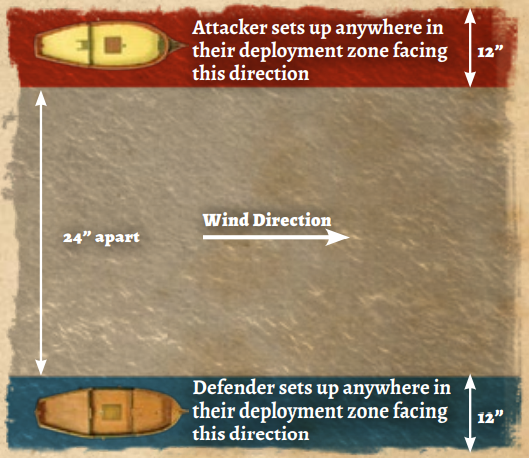
The Defender sets up within 12” of a board edge facing in the wind direction. The Attacker sets up in the same way on the opposite board edge, at least 24” away from the defender.
OPTIONAL RULE:
- 9-10: +1 to wind speed
- 5-8: Gust (wind speed +1 for this turn only)
- 2-4: No Change
- 1: Lull (wind speed -1 for this turn only)
Derecho: Use the Tropical Weather chart. After drawing activation cards each turn , both players roll on the Wind table, but do not apply its results until the end of the turn. Apply the player who rolled the highest result first. If using this Optional Rule, do not use the Nor’easter Optional Rule.
Thunderhead: When both players reveal the same activation card, if either player rolls a 10 when rolling to see who goes first, a bolt of lightning strikes one of that player’s ships. Choose the deck they control with the tallest mast, and roll a 12 dice cannon hit against that deck’s rigging that hits on 3’s. Any lucky hits start a fire on that deck instead of the usual result, but roll for Critical Hits like normal.
GAME LENGTH:
Use the Random Game Length rule.
OBJECTIVE:
>> Attacker and Defender gain a strike point at the end of turn 3 and later if they control any size 2+ ships that are at their maximum sail setting.
>> Attacker and Defender gain a strike point if they have at least one Sails and Spars or Sheets and Shrouds damage marker.
Blood & Plunder Sea Scenario 4: Fleet Action
Blood & Plunder Sea Scenario 4: Fleet Action
The Attackers ship is part of a fleet of larger ships and was directed to sail ahead to disrupt the enemy line. The Defender’s ship intercepts the Attacker, but both ships must be ready to move if the battle turns and the large Ships of the Line draw close.
SETUP:
The whole board is considered Deep Water, with any additional water terrain added at the discretion of the players. If using the Alternative Reef Region Rules, the Defender may not choose Clubs: Shallows, and may discard these cards to draw a new card.
The wind starts from the board edge opposite the defenders board edge.
SCENARIO RULES:
None
DEPLOYMENT:
The Defender picks a board edge, and sets up their ships so a part of the ship is within 2” of the deployment edge.
The Attacker sets up anywhere at least at least 24” away from the defender, and cannot deploy windward.
OPTIONAL RULE:
Units in this separate force may only receive command points from their own Characters or a Commander. Casualties from this Force do not count towards a strike point, and it’s Commander will always fail a strike test.
Trade Shot: Use the Long Range Bombardment rules to fire two salvos before the battle begins. Additionally, roll one extra long range medium cannon die for each 50 points of the total limit.
GAME LENGTH:
Six turns.
OBJECTIVE:
>>Attacker and Defender gain a strike point if they have a unit on a ship they do not control.
>>Defender gains a strike point after turn 3 and later if the Attackers flagship is downwind of the Defender’s flagship.
>>Attacker gains a strike point after turn 3 and later if their flagship has a Leak or Steerage Critical damage marker.
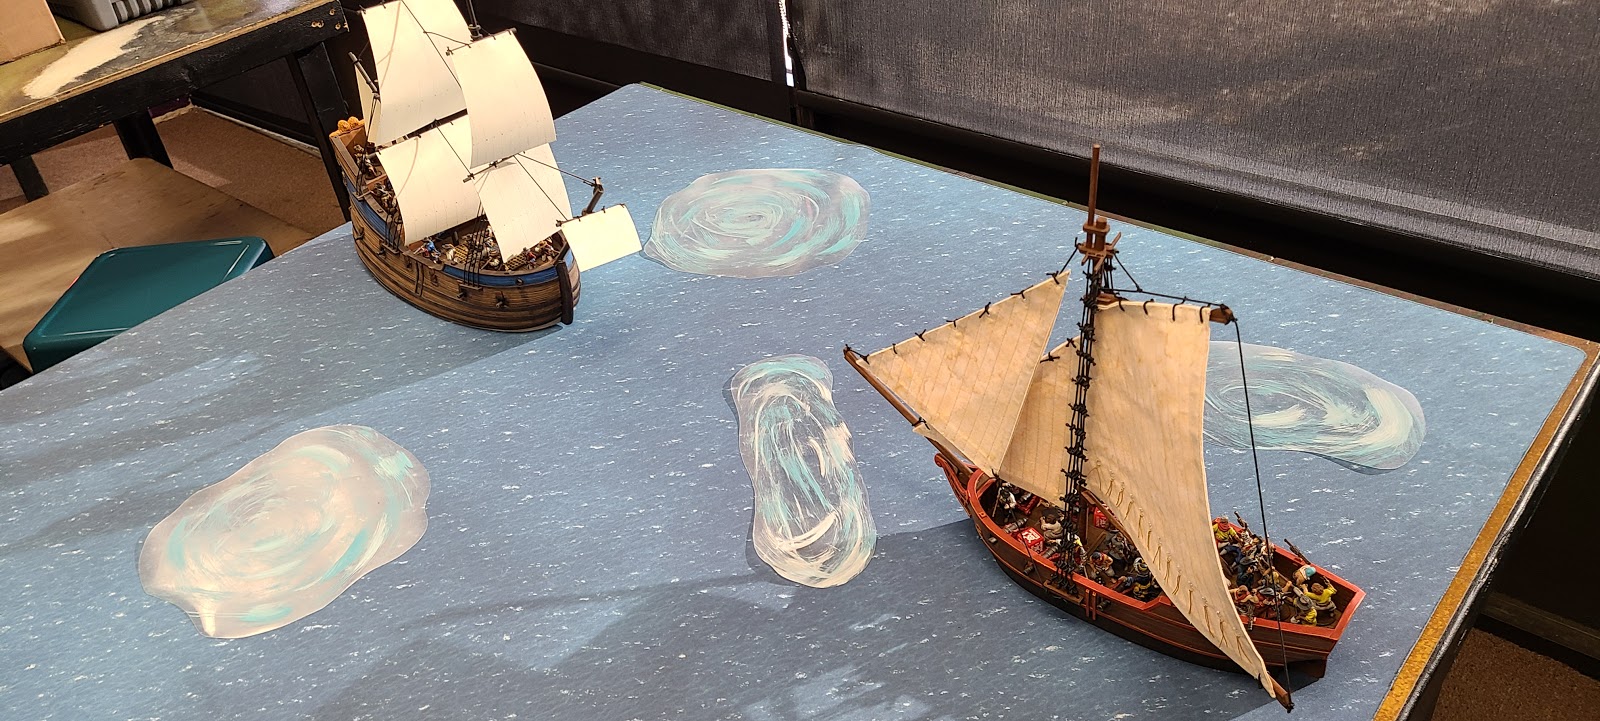
Blood & Plunder Sea Scenario 5: Listless
Blood & Plunder Sea Scenario 5: Listless
With what little wind they have abeam, the attacker and defender approach each other.
SETUP:
The whole board is considered Deep Water, with any additional water terrain added at the discretion of the players.
The wind starts from a short board edge, if playing with a short board edge, or any board edge if not playing with a short board edge.
SCENARIO RULES:
The Wind Gauge starts at -3.
At the end of each turn, before activation cards are drawn, roll a d10 die. On a 7+ there is a Gust (wind speed +1 for this turn only).
DEPLOYMENT:
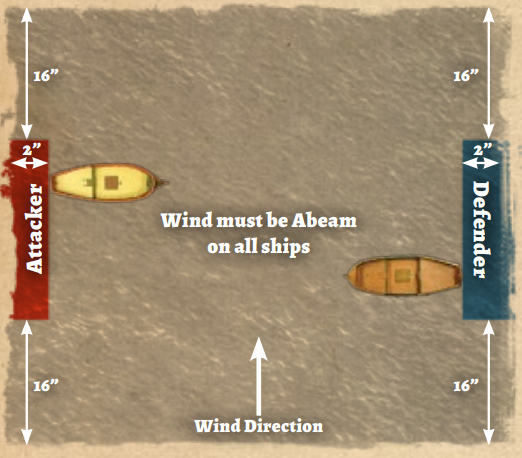
The defending force picks a board edge, and sets up at least 16” away from each corner, Ships are placed so a part of the ship is within 2” of the deployment edge.
The attacker does the same on the opposite board edge.
All ships must be 90 degrees to the wind (Abeam) when placed.
OPTIONAL RULE:
Sailor’s Whistle: Remove one fatigue from any unit with Sailors or Expert Sailors whenever there is a Gust or +1 to wind speed.
Tide Over: Choose a random board edge before drawing the first activation cards. This is the Tide Edge. Each time a ship would drift each turn, instead of drifting the ship moves 1″ closer to the Tide Edge.
GAME LENGTH:
Seven Turns.
OBJECTIVE:
>> Attacker and Defender gain a strike point after turn 3 or later if they do not have an unshaken unit on their flagship assigned to the Sweeps or Sheets and Shrouds.
New Way to Place Terrain in a Sea Game: The Alternative Reef Region Rules or ARRR
The ARRR system is a new method for setting up your Sea game boards in a creative and fun way to keep things from being just a boring empty board. We’ve developed two different terrain generation methods below.
Method 1: Using Dice to Randomly Generate Your Setting
This is the first and easiest method. To generate your scenario, to roll 1d4.
- 4 is Deep Water
- 3 is Known Shoals
- 2 is Nearby Coast
- 1 is Shallows. If a player has a 4+ deck ship reroll 1’s.
What each of these mean, and the terrain elements you put in the terrain pool are listed further down.

Method 2: Defender’s Choice
This other method let’s the Defender choose where the game takes place. Instead of rolling a die to choose terrain, do the following:
- After rolling for the Attacker/Defender, but before The defending player draws three cards.
- If they draw an event they may discard their hand and draw three more cards.
- The Defender chooses one of the 3 cards and reveal it, then add terrain to the terrain pool based on the suit of the revealed card.
- If any player has a size 4+ ship, and the suit Clubs is drawn, the defender may discard these cards and draw a new card.

The Suit of the card revealed determines terrain setting for the game.
- Spade: Deep Water.
- Heart: Known Shoals.
- Diamond: Nearby Coast.
- Club: Shallows.
After revealing cards, the defending player shuffles them all back into their activation deck.

Terrain Setting Types
Based on the outcome of your method selected above, you will now develop a “terrain pool” for placing pieces of terrain of obstacles on the board.
- Deep Water: Do not add any terrain to the terrain pool, unless the scenario directs you to.
- Known Shoals: Add 2 Shoals to the terrain pool.
- Nearby Coast: Add 3 Shoals to the terrain pool.
- Shallows: Add 1 Sandbar or Island, and 2 Shoals to the terrain pool. Sandbars and Islands block line of sight, and any size 2+ ship that moves within 3″ of them runs aground.
Deploying Sea Terrain on Your Blood & Plunder Game Table
Starting with the Defending player, each player alternates chooing a terrain piece from the terrain pool and placing it on the table. These can be placed anywhere on the board, at least 6″ away from another piece of terrain.
By Guy Rheuark
Additional Articles of Interest
- Creating Shoal Terrain for Blood & Plunder – learn to craft some custom wargaming terrain pieces for your own game tables.
- Force Building III: Building for Sea Games
WOah! Looks very interesting, I must test al of these!
Pingback: The Ghost Ship Scenario - A Blood & Plunder Halloween Special - Blood & Pigment