After clashing with the English Buccaneers Commander Thomas Clarke sailed North hunting the Spanish treasure ship. Instead of finding a helpless merchant ship full of plunder my English Pirate Hunters came head to head with a patrolling Spanish warship!
This second encounter in this campaign was fought against Guy, who is running the campaign and playing as any Spanish forces the other players might run in to.
The Forces
I’m ran the exact force I used in my first campaign game a couple weeks ago.
Led by Inspiring Thomas Clarke with Broadside, my Pirate Hunter Force contained:
- A unit of 8 Sea Dogs without pistols with the commander attached.
- A unit of 8 Sea Dogs without pistols with a Master Gunner attached.
- A unit of 6 Sea Dogs without pistols.
- A unit of 6 Trained English Militia.
- A unit of 4 Trained English Militia.
- A unit of 4 Zeelieden without pistols with a Sailing Master attached.
- A Sloop of War with a Fighting Top, 4 pairs of Medium Guns and 4 Swivels.

Guy’s Spanish Force looked like this:
- A unit of 9 Marineros Piqueros with an Untested Commander and Musician attached.
- A unit of 9 Marineros without pistols with a Master Gunner attached.
- A unit of 7 Marineros without pistols.
- A unit of 8 European Sailors with muskets with a Grizzled Veteran attached.
- A Light Frigate with 6 pairs of Light Cannons and 2 Swivel Guns.

My English crew numbered 37 models while the Spanish had 34.

The Scenario
Encounter at sea! Standard set up where we face each other with the wind abeam. We both had the opportunity to place one piece of shoal terrain before the game began.

I rolled a Fatigue check for all my units for the Musician Terror rule and took Fatigue on 4/6 units. Not a great start for me!
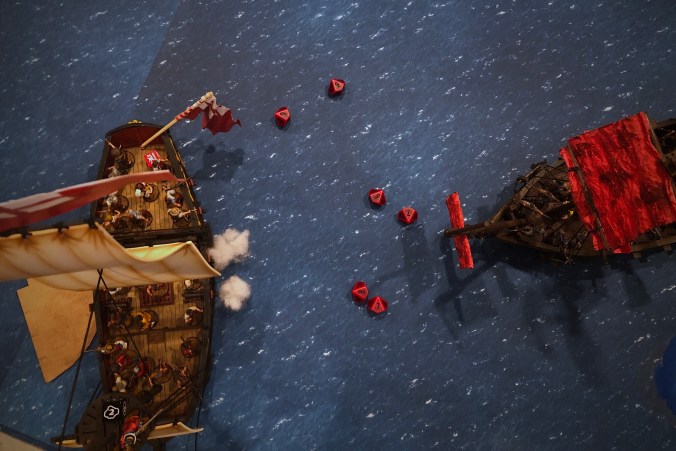
The Game
The game began with the Spanish turning away from the wind and my English ship turning into the wind angling for a shot with the cannons.

My first shot with my middle guns scored one hit on the sturdy Frigate.

My commander’s unit took some early fire and lost a man and took a second Fatigue.

The initial Spanish cannon fire was more successful than the English guns and started to whittle down the English hull to 3 Fortitude right away.
On turn 2 I turned away from the wind as we sailed past each other. I fired my mid deck guns again and while both guns made contact, I got no hits!

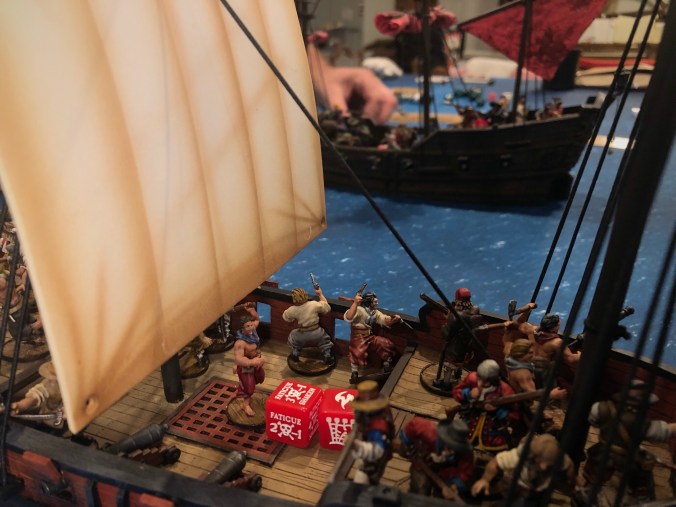
The Spanish sailor musketeers fire an early shot and scored four tens out of 8 dice and roughed up the crew in my front deck.

I was able to fire all four cannons on turns 1 and 2 but didn’t have much to show for it. My small arms fire did more to suppress the Marineros on the main deck than the cannons did.

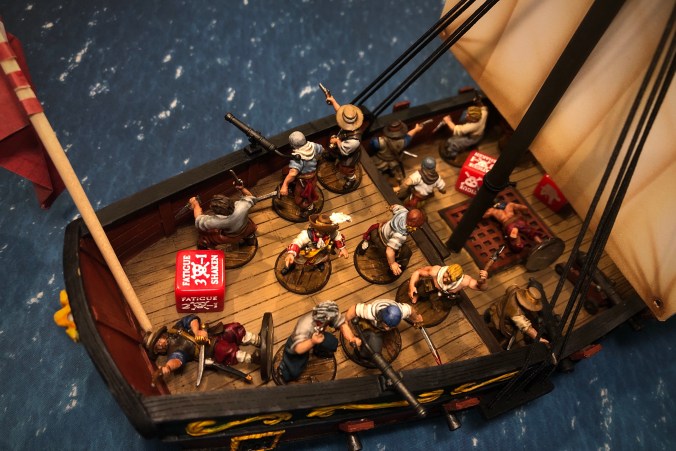
By the middle of turn 2 I had fatigue spread across all my decks but I had scored some good hits on the Spanish crew.

The Spanish sailor Musketeers struck again and scored 4 hits against the Militia in the fighting top but luckily I saved two of them.

At the end of turn 2 I turned my Sloop of War into the wind with the intention of crossing the eye of the wind.

By the end of turn 2 I had taken a lot of hull damage but I had managed to take out several of the gun crew on the main cannons and give them 3 Fatigue which would slow down the incoming fire.

On turn 3 the Spanish turned into the wind and we both crossed the wind’s eye as we tried to bring our fresh guns to bear.

I used my Zeelieden to box haul and get out of the wind’s eye with a hard backwards turn.

As the Spanish Tacked I almost lined my ship up for a raking shot but a 2″ turn wasn’t enough and a 3″ turn was too much. So close!
I finally landed several hits on the Frigate but the Piqueros in the fore deck saved like bosses with that 5 Save in hard cover.

Moving into turn 4 I had to make some repairs as the Spanish cannon fire started to pile up lucky hits and even some Criticals as my Fortitude plummeted to 2!

As the French Spanish cannons fired off the port side my Fortitude reached 1. My ship was basically taking a critical hit on every shot!
My ship was threatening to break up but with 3 unassigned units I was able to remove several damage markers fairly quickly, including a nasty Fire marker on my main deck!
My command unit of Sea Dogs had good luck saving but the Fatigue piled up and eventually they went prone.
Blood flowed freely on the Spanish Frigate while water flowed freely into my English ship.

I turn 5 I drew an event which ended up scoring a lucky hit on my Sails and Spars which slowed my ship.

Going into turn 5 I was able to get off another shot with my rear guns. I’d been keeping up a steady rate of fire but had just now got the Frigate’s Fortitude down to 4 while mine was at 1! I was finally close enough to only need 6’s. This was my chance to finally get some real damage on the Frigate!
One cannon missed and the other rolled two 5’s… I had fired off at least 12 cannons and rolled more than 20 damage dice but only applied 7-8 damage to that beast of a Frigate! And of all those dice which needed 9+ to hit in most cases, I had failed to roll a single 10 to score a Lucky Hit! English gunnery had failed!

I had an amazing moment on turn 5 when my Swivel Guns score five 10’s out of 6 dice and basically eliminated the crew on the 3 guns on the main deck.

Near the end of turn 5 another Spanish volley of cannons gave me a critical hit which knocked down my front mast. My ship was immobilized!
At the end of turn 5 we calculated Strike Points:
- I had 1 Strike point for hull damage and one for being immobilized and 1 for casualties.
- Guy’s Spanish had 2 for casualties.
Standing at 3 to 2 strike points the game went into the final round with both crews pushing themselves to the max to keep their fighting machines moving.

I tried in vain to clear the broken mast but failed with two different dedicated repair actions. The Spanish crew on the poop deck had abandoned their guns and now moved forward to take control of the main set of guns.

With all cannons unloaded and the crews badly battered, not much happened on that last turn. Guy tried hard to ram into my drifting ship to apply two more damage (which would count as a Critical Hit on my poor ship), but was just a few millimeters short of making contact.
My crew outnumbered the Spanish crew now but both were badly battered. As a futile act of defiance I used my final action to grapple his ship. I’ll just pretend that there could have been a successful boarding action…
The game ended there! The Strike Point count hadn’t changed over that last turn. I was one casualty short of taking a 4th Strike from 50% casualties.

With 3 English Strikes to 2 Spanish, Captain Clarke has to cede the field to the bold Spanish commander. It was a hard fought game!

The final casualty count was 18 dead Spanish of 34 starting models and 17 English dead of my original 37. A bloody game, especially considering there was no boarding action:

Post Game Thoughts
- My English suffered defeat! The crew functioned so well in my first game and it seemed to do well here as well but I just couldn’t score hits on that Frigate. Even with Medium Guns, I couldn’t outshoot the 6 Light Guns on that Frigate. I may have done better to try to grapple and board after I was clearly losing the cannon fight. I need to remember to stay flexible and not fixate on my intended strategy after the game starts.
- That Light Frigate is a hard nut to crack! Those 6 pips of Fortitude 5 are tough to cut through in the early game, especially as ranges can be on the longer side of things. Guy recently wrote a Frigate analysis article for this blog and he boldly stated that the Light Frigate is the best ship in the game and I think I have to agree! I eventually got the Frigate Fortitude down to 3 but I certainly lost the cannon fight. My ship was pretty well smashed by turn 4 and those last two turns just piled up more Critical Hits that took away a lot of my actions as I had to address most of them to stay in the game. I was lucky to not get a Catastrophic Damage crit.

- I eventually got a total of 14 damage on the Frigate but I still failed to roll a single 10! No Lucky or Critical Hits out of all those dice! Overall my dice weren’t terrible but it was a little frustrating taking so many Lucky and Criticals as my ship took a pounding but failing to roll 10’s with all my cannon dice. And then that event came up and game me another critical damage! Talk about salt in the wound!
- The Master Gunner continues to prove himself very valuable. The -1 to hit seems like a bonus but his extra reload action is the best. You sometimes have to forfeit it if you want to do a Broadside with your commander but in my case, I was able to still use the action to reload Swivels on my third deck. The action efficiency you can get out of two gun crew units with the Commander and Master Gunner is pretty amazing. You can reliably shoot your cannons for 3-4 turns in a row if you can leverage the Command Points and free actions properly.
- The Light Cannons weren’t bad at all in this game! The 6 Spanish guns had 12 dice just like my 4 Medium Guns but they out-shot me!
- My crew is fairly “complex” for a 200 point list, but I think I’ll stick with the basic set up for now. Six units is a lot and it means my units are on the smaller side but for now I’m enjoying the benefits of all those activation cards to give me good options through a round and the flexibility of having 3 unassigned units is very helpful. With all those damage markers I took over this game, I would have been in bad shape if I had less units on board.
- The Spanish European Sailors with Muskets really pulled their weight in this game. Their 6 Shoot skill with muskets means they’re better than any Militia unit when it comes to small arms fire, they have a better Save than Militia and they are always there to perform difficult sailing maneuvers but they can shoot if their sailing services aren’t required. It worked out really well.

- My tiny unit of Zeelieden was very valuable to me as well. Expert Sailors with a Sailing Master means you have a really good chance of succeeding basically any sailing test. It really hurt when the last Dutch man finally died in this game.
- In this “heavily modified campaign” commanders get 6XP for winning games and 4XP for losses. Even though I lost this game I reached the 10XP upgrade threshold. This game pushed me to consider more boarding strategies and that helped me decide which abilities to add to my commander. Ruthless isn’t a good ability for a cannon ship commander but it could be great if applied to a Militia unit’s Shoot test or a Charge or Fight test once ships were grappled. I also took Expert Pilot after my experiment getting my ship grounded in my last game.

- Box Hauling is my new favorite thing! I’m exaggerating a little but turning into the wind’s eye, the crossing it with a reverse turn with a Box Haul is a more effective way to turn around that simple turning and it’s more reliable than Tacking in a square sailed ship.
Thanks to Guy for playing a tough game and running this campaign. It’s a lot of fun and I encourage people to explore the campaign in No Peace Beyond the Line is they have a local group of players.
Thanks for reading!
Great report a as always!
I really enjoy reading your blog!
Thx for the work!
I have a question, do you maybe have any tips on how to transport ships?
I’m still not sure how I want to deal with that.
Cheers
Julian
I nestle my ships into a cardboard box or box lid with towels so it can’t move around. Kind of awkward.
Hehe yeah that’s probably the way to go! Thx!
Keep up the good stuff!
Cheers
Pingback: Battle Report – 2v2 Campaign Naval Encounter | Blood & Pigment