My local group has just started up a new custom campaign and this was my first game. We played this game at Oregon City Geeks & Games, a great store that fully supports Blood & Plunder.

The campaign in No Peace Beyond the Line is excellent and I encourage anyone with a local group to give it a try. This campaign we’re doing this time around is simplified to make it more accessible to more players. All the force restrictions and Resource element has been taken out and replaced with a map and travel element while we try to locate and plunder a Spanish treasure ship in the Caribbean.

I got a blank map with my starting location at the opening of the campaign and I got to choose which direction I wanted to travel. If my path crosses any of the other players, I’ll have an encounter with them. I’ll also get some info on any sails I might see on the horizon.
I traveled NW and bumped into a Brigantine full of English Buccaneers, out searching for that same Spanish treasure.

Buccaneers are close enough to pirates so my Pirate Hunter crew attacked!
The Forces

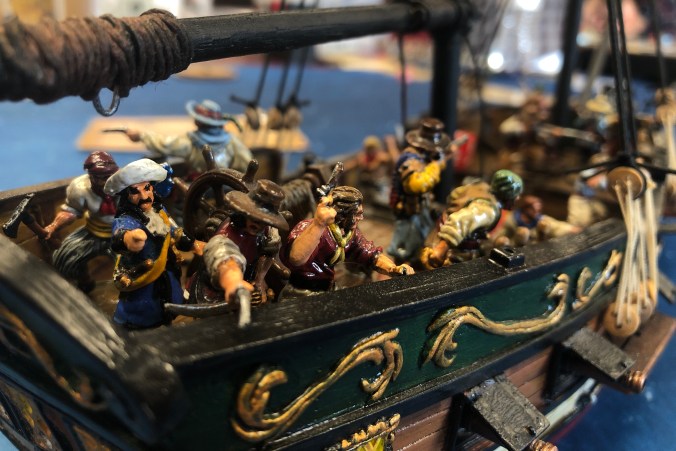
My 200 point Pirate Hunter force was led by my custom campaign commander, Captain Thomas Clarke. As a starter commander, he’s nothing special, but he has two abilities that make him above the power level of the standard 0 cost captain.

My full force consisted of:
- A unit of 8 Sea Dogs with no pistols with Commander Thomas Clarke attached.
- A unit of 8 Sea Dogs with no pistols with a Master Gunner attached.
- A unit of 6 Sea Dogs with no pistols.
- A unit of 4 Zeelieden with no pistols.
- A unit of 6 Trained English Militia.
- A unit of 4 Trained English Militia.
- A Sloop of War with a Fighting Top, 4 Medium Cannons and 4 Swivel Guns, 2 in the front and two in the back.

I planned to use the small unit of Zeelieden for my sailing actions, or even repairs if necessary.

I split the 10 English Militia into 2 units so I could put an entire unit into the fighting top.

Kevin’s English Buccaneer commander is starting the campaign with the exact same stats and abilities as my own. 1 command point, 4″ range, Inspiring and Broadside.

His full Buccaneer force consisted of:
- A unit of 8 Freebooters with his commander attached (Captain Mel O’Tonin in the past).
- A unit of 8 Freebooters.
- A unit of 8 Sea Dogs with no pistols.
- A unit of 8 Sea Dogs with no pistols.
- A Brigantine with 4 Medium Cannons.

Kevin has spent a good bit of time reading up on rigging and adding more authentic rigging and masts to his Brigantine and it looks great.
The Scenario
We just used the Encounter scenario rules which are easy to keep track of.

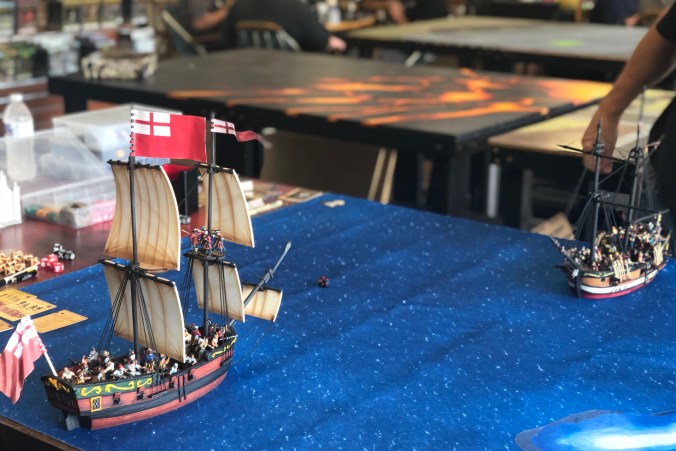
I rolled high for the Attacker roll so Kevin placed his ship first then I placed my ship upwind of his.

Our forces were both basically set up to do the same thing: hit hard with cannons and heckle with small arms fire.

With 16 Freebooters on his ship, Kevin had superior musketry but I had 4 swivels to balance that disparity.

The Game
My plan was to initially turn into the wind and shoot off my starboard cannons, then using my Zeelieden and Sailing Master, wear hard away from the wind and shoot off my port side cannons right away as well.

But the Buccaneers came on too fast.

I started with my Militia in the fighting top. Potshots hitting on 10’s.

My militia were ineffective but Kevin’s Freebooters were accurate enough to apply a point of Fatigue on my mid deck Sea Dogs right away.

On the second activation I turned into the wind to present my cannons and shot them off.

I missed with one cannon altogether and the second cannon didn’t do any damage which was a discouraging start for my crew.

We used a piece of shoal terrain and that made maneuvering interesting.

Kevin shot off his mid deck cannons and I took damage on my front deck but didn’t lose enough guys to hurt my cannon efficiency.

I was able to shoot my aft cannons after the Buccaneers moved for the 3rd time and it went better with 4 hull damage and 2 dead Freebooters to show for my efforts.

I used my Zeelieden to raise my sail from 4″ to 5″ and then succeeded with the Sailing Master as well so instead of going 2″ into the wind, I was able to move a solid 4″ and close some distance between us at the end of turn 1. I shot off my 6 Swivel dice from the front deck into the aft of the Brigantine and caused some Fatigue.

Kevin drew an event going into turn 2 and the Unsecured Rigging event gave him a Sail and Spares Lucky Hit on his ship. This critical hit reduced his speed by 1″ until he was able to repair it a turn later.

I got off another 2 gun shot with my cannons and got 4 hits but still no Lucky Hits. this put some real Fatigue on the Sea Dogs and Freebooters in the back of the Brigantine.

The Buccaneers fired back with their fresh mid guns and killed a Dutchman and gave me a Leak Lucky Hit!

I got my second pair of cannons to fire again on this second turn and this gave the forward unit of Freebooters enough Fatigue to go prone.

Sea Dogs on cannons are pretty great. You can fire two or three or even 4 turns in a row if you have targets, manage them carefully and occasionally push them a little.

Even after firing all 4 of my cannons twice into that Brigantine, I didn’t get even 1 Lucky Hit. The Unsecured Rigging event had done more to slow that Brigantine than I had so far!

I like having the Militia units aboard to lay down some small arms fire but they sure missed a lot… I did one drilled shot with the unit of 6 models and I applied 2 hits but they were both saved!

Kevin got one more round of cannons in before the end of turn 2. We were both building up some damage on our ships’ hulls.
I was very proud of my cannon management skills as I shot off my mid guns for a third time on the third turn. At this point I needed 7’s to damage. I rolled 2 hits with 6 dice but hoped for better so I used a Fortune Point only to roll 0 damage! Disaster!

Apparently I pushed these Sea Dogs too hard and they skipped the “aiming” part of this firing process.

Starting the round square in the wind’s eye, Kevin used his Freebooters to Tack into the wind to keep control of his ship.
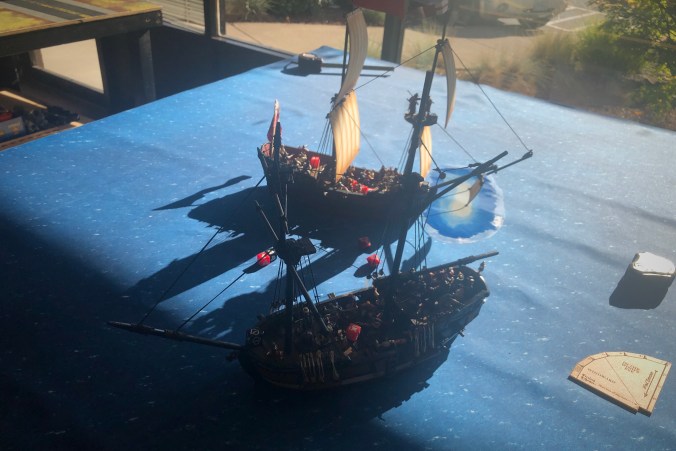
I had to roll for grounding my ship twice as I turned into the wind and sailed over the shoal.

I turned into the wind at the end of turn 4 to bring my guns to bear again at close range. I hoped this would be a devastating broadside!

I fired all 4 guns at minimum range but one gun missed with a 1. I had one Fortune left but I could see a Tacking maneuver in my near future and with a disadvantage with square sails, I wanted to save that coin to ensure success there so I rolled the 9 cannon dice and got 6 hits with 3’s and 4’s as my target numbers. This wasn’t the coup de grâce I was hoping for. 6 hits left the Brigantine with 1 bubble of Fortitude 3 left so I got a Critical hit and a lucky hit. If I had got 8 hits I would have put the Brigantine down to 2 Fortitude and given it two Crits and a Lucky!

Even so, 6 hits hurts! It was spread over two decks and 3 units and it left the Buccaneer commander with 1 Freebooter left in his unit and the mid deck Sea Dogs were in pretty rough shape.
Looking back at this moment I should have attempted to grapple his ship. My men were fresher but I had become too focused on my cannon tactic! Grappling would have been smart as unforeseen things can happen in this game…

I drew my second event going into turn 5 and I hit a submerged hazard!

Now I was heading into the wind and right on top of a shoal. And with only 1 Fortune point left!

I rolled successfully over the shoal for the event and my first move. I had to Tack at this point or give up the chase. Square Sails on this Sloop of War forces you to roll two dice and take the lowest number. This is why I brought Zeelieden! Activating on a Club, I brought the target number for the Advanced Maneuver down to a 2 for the Zeelieden. And I rolled a 1… I used my last Fortune to re-roll and succeeded on the second attempt. I was still in the wind’s eye and on the shoal, but I crossed they eye so I could Wear on my next move.

Kevin had made the tactical decision to drift for one turn as he was already past the eye of the wind and would regain control of his ship after one drift movement. With the updated assignment rules, it’s harder to have crew ready to do these sailing actions

While we were still close I fired my swivels again but the English Buccaneers refused to die!
The two English commanders passed each other as they crossed the the wind’s eye, neither ready to give up the fight. Both our crews were getting worn down. Turn 5 was the first turn where I didn’t get to fire my cannons.
My casualties were still fairly light at 5 models while the Buccaneers had taken around 50% casualties

I had some interesting sailing options on my last move of turn 5. I could wear to starboard and away from the wind and get out of the danger zone but I would present myself to get shot by the freshly reloaded aft cannons on the Buccaneer ship while I would take my guns totally out the picture for at least two more moves. Tacking into the wind was dangerous and would put my squarely on the shoal so I didn’t want to do that. My other option was Box Hauling. I hardly ever use this maneuver but at this moment, it seemed like a good option! I could keep my cannons covering the projected path of his ship, keep out of his firing arc for at least one more move and back off this terrible shoal. I would still have to Wear away from the wind at some point but even my lubberly Militia could do that.
I decided to Box Haul. I activated my Commander last so I could use my Zeelieden again for this Advanced Maneuver. I passed and moved 3″ straight back. All was going fine until I rolled for the shoal again and my luck ran out! I was beached!
We calculated the Strike Points at the end of round 5:
- My English Pirate Hunters had a Strike Point for having their ship beached, and one Strike Point for damage on my hull (I believe I misinterpreted the rule here and I actually didn’t have this second Strike Point).
- Kevin’s English Buccaneers had 2 Strike Points for casualties and 1 Strike Point for damage to the Brigantine’s Hull.
At 2 to 3 Strike Points, the game continued to turn 6!

Going into the last turn my ship was beach on the shoal and my sail setting was still at 5″. To get free of the shoal, I would have to reduced my sail to 0″ which would take 3 successful dedicated actions, then another dedicated repair action to get off the reef. Long odds but I decided to try it. There’s no honor for a captain who gets stuck on a sand bar! My first sail setting test failed… My second one succeeded. My third unit failed and at that point, I could tell it really wouldn’t do me any good to free my ship if I wasn’t able to do anything else for the entire turn. So much for honor…

Maybe my Militia will finally get some hits now that my ship is stationary on the shoal! Hopefully it will improve their aim.

A final shot from my swivel guns caused a little more mayhem.

Kevin’s Buccaneers turned away from the wind to exchange some final cannon fire near the end of the game.

My 4 Militia in the Fighting Top who had stubbornly been missing the entire game finally got two 10’s out of their four dice and ended up picking off the last Freebooter leaving the Buccaneer commander by himself! The Save penalty actually made a difference in this shot as well! The 2 points for the Fighting Top actually did something!

Kevin’s aft cannons got one more shot which killed another model and my guns were able to squeeze off one final shot on my last activation. Even with the Brigantine’s Fortitude down to 2, I only got 1 damage. The game ended with a whimper as the exhausted forces rolled poorly on their last actions.

That’s only two cannons firing, plus the old puffs from the Swivels in the front.
At the end of turn 6 the Strike Points were no different than the end of turn 5. I had given myself a Strike Point for damage to my hull but the way that rule is worded, I don’t think that these Brigantine ships get a Strike Point until their Fortitude is down to 2. My Fortitude was still hanging on with one more bubble of the 3 line! In either case, I ended up winning with fewer Strike Points. Not a glorious victory as the battered Buccaneers sailed away from my ship stuck on a reef, but a victory nonetheless. I sure wish I had bought that Shallow Draft trait…

The final condition of our ships.

My casualties
Post-Game Thoughts
- That was a cannon-heavy game! We had cannons firing every single turn. I felt good about my cannon management but I wasn’t able to get the Critical and Lucky Hits I needed to really slow the Brigantine down and destroy it. Kevin didn’t fire his cannons as frequently but they sure hit hard when he fired! I had to deal with several Lucky Hits on my ship.

- Even though it was a “cannon game,” my small arms and swivel gun fire did good work. When those Freebooters shot at me it hurt as well, but they ended up doing more Sailing and Repair actions over the game so they didn’t fire as much as they would have otherwise.

- The “new” assignment rules really encourage you to take at least one sailing unit not assigned to any guns. It’s really bad if you need to take an Advanced Maneuver and there’s no one to do it. I was very glad I brought that tiny group of Zeelieden. The last game I played with them they failed every task I gave them but this time they paid for themselves several times over. I almost wish I had 2 sailing units. I had the Militia unassigned and I actually had them accomplish a Wearing action once since they couldn’t totally flub it. This assignment rule also makes the Freebooters and Flibustiers better in my opinion. You don’t necessarily want to burn their actions doing sailing stuff, but having that flexibility is nice when the alternative is drifting for an entire turn!
- Shoal terrain really makes a naval game more exciting! Having to choose to either take the risk to give yourself that great cannon shot at the enemy or play it safe and lose a turn of firing is a fun choice. I have been taking the risk and this time I ended up paying for it. Although I guess I didn’t choose to sail over this shoal. It was an event! I think I’ll make a couple more shoals and give them out to other players in my club. Gives you a reason to burn 3 points on Shallow Draft. Cheaper than a Ship’s Pilot.

- My list performed well but I’m realizing my unit sizes are dangerously small. I really like the 6 activation cards but if I got some unlucky Saves or a massive broadside hit me hard, any Sea Dog unit that takes 3 casualties could no longer man it’s cannons. And if my Zeelieden unit only had 4 men so it’s very precarious. That made me look up the advanced maneuver rule. I was wondering if there was a minimum unit size for taking those actions but I couldn’t find any rule like that. It appears a unit of 1 model could change the sail setting just as well as a unit with 12. If I missed something, please let me know!
- It didn’t work out in this game since my boat hit that shoal, but I gained an appreciation for Box Hauling in this game. You don’t want to fail that maneuver but moving backwards can be more helpful than I thought. And you can turn while you go backwards which is huge. You could turn hard into the wind, then Box Haul backwards to the opposite direction and turn your ship on a dime. I’m going to have to try that in my next game. I think you could fire a broadside, turn into the wind, Box Haul away from the wind and present your other side for another broadside.

- I like the Brigantine hull for this size of game. You could easily fit 250 points into it, but 200 feels fine. I kind of like shooting the three cannons at once you find on a Sloop and Frigate, but two sets of two works out alright.
- I mentioned this before but I think I messed up calculating Strike Points for Hull damage. The rule says you get a Strike Point if your Hull Fortitude has been reduced by half. I keep equating half your damage bubbles with half your Fortitude but that’s not the same thing. You can have well more than half your ship’s health gone but still be at more than half your starting Fortitude. Most ships will take that Strike when they hit 2 Fortitude.

This was the first game in our campaign but as I finish this article I’ve already been assigned my second game! I headed NE around the Bahamas after this engagement and I bumped into a Spanish warship so that battle report will be coming soon. Hopefully the presence of a warship means the treasure ship isn’t too far away.

Thanks to Kevin for playing a good game. We kind of fought to a standstill, and my ship took that a little too literally. Our campaign rules let us decide to cooperate after our first encounter so Kevin and I coordinated our next moves through the Caribbean and if we stay reasonably close, we can share information as we see sails on the horizon. Our two captains earned mutual respect for each other and decided to work together after working hard to destroy each other for an entire afternoon.
Thanks to Geeks & Games for hosting our game session and fully supporting this game and our local club!

Thanks for reading! I’ll continue posting campaign reports as my Pirate Hunter commander gains experience.
Joseph you wrote this well.
I would agree your zeelieden made a big difference. And your swivels were devastating. It was a shooting game. And you had the better of it. I’d say though it was a well rounded though with the rigging event and the shoal playing big parts as well. As always I learned so much. Thank you for a great afternoon.
I have just stumbled upon this blog, but your battle write-up skills are superb sir, they really make me want to play.
Blood and Plunder shot off like a rocket at the local scene when it released, but by the time I came around those who played it stopped playing at the local store and I never got in touch with them. The rest of local stock went to half price and cleared out in a flash. I bought the original book of rules and two starter crews, but I haven’t painted them up yet, not sure who Id play with.
But you’ve got me motivated as heck to kick it into gear and do it! Looking forward to the next report from your campaign! And your paint looks as good as your reports read!
I take it your recommend I get the No Peace Beyond the Line book?
Thanks for the kind words! It’s a great game and I’m glad you’re jumping in!
I hope you can connect with players in your area. I think you can get away with just the core book starting out with French or English, but you’ll probably want to pick up No Peace Beyond the Line pretty soon as there’s a bunch of good stuff in it.
I have the next campaign battle report half finished right now. I’ll get to work!
Cheers
Pingback: Battle Report – Campaign Game 2, Pirate Hunters vs Armada de Barlovento | Blood & Pigment