This is a “Control the field” Scenario Battle Report featuring the South American Tribes vs English Buccaneers at Sea. I’ve been playing a lot of South American Tribes on land lately and I’ve been having good success with them on land. I figured it was time to try them at sea!
The Forces

This was a standard 200 point game without any of the campaign rules or commanders that have been common in my battle reports recently.
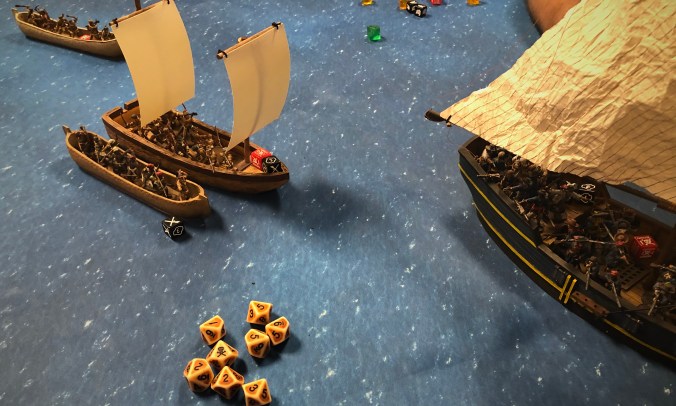
I played the South American Tribes. Natives can’t take ships size 2 or higher so I put my men in a Piragua and two canoes.

I used an Untested commander attached to a unit of 8 Veteran Warrior Musketeers with a captured Merchant. For arrow power I used a unit of 6 and a unit of 8 Warrior Archers with Grizzled Veterans and Poisoned Arrows. A unit of 8 Warriors with an officer and Thrown Weapons rounded out my list. I also added Sidearm muskets to the Warriors and the larger unit of Archers.

I put the Musketeers and the larger unit of Archers in the Piragua and the Warriors and smaller unit of Archers into canoes. With 32 models, my force takes a Strike Point at every 8 casualties.

My opponent, Guy R, ran a focused list of English Buccaneers in a Privateer Sloop. His central 107 point unit was a command groups of 13 Veteran Freebooters with a Sailing Master. In the back of his Sloop he had a unit of 11 Sea Dogs without pistols led by a Officer and manning the 4 Swivels. In the front deck with the Veteran Freebooters was another unit of 8 Sea Dogs without pistols, manning the 2 Swivels and accompanied by a Grizzled Veteran.

With 33 models this list has the capability to throw 31 Ranged dice with a base Shoot of 6 basically every turn!
The 6 Shoot Save on the Veteran Freebooter wasn’t a welcome sight for me. In the ship’s hard cover, that Save goes down to a 2 when defending against bows and that is…annoying.
The Scenario
The Sea Battle round of our upcoming local tournament will be fought using the Control the Field scenario so we used these rules and counted this as a practice game.
The rules are fairly simple here. The Defender places within 2″ of the downwind side of the board and the Attacker places anywhere at least 24″ away from the Defender, presumably upwind. If the Defender ever ends a round with a ship/boat upwind of their opponent, the Attacker gets a Strike Point. If the game goes all the way through turn 6 and the Attacker ends upwind if their opponent, the Defender gains a Strike Point.

I deployed my flagship Piragua first then Guy deployed his Sloop a full 30″ away from me. I deployed my canoes close to the Piragua to maximize my Character’s actions.
The Game
I started with my Piragua under sails, the Warriors manning the Sweeps and the Warrior Archers using Paddles so they could fire their bows as they approached. With a maximum range of 24″ on both my Archers and Firelock muskets, I didn’t even have a chance to get any hits on the first activation.
At 27″ that terrifying group of Veteran Freebooters fired and got 4 tens out of 13 dice! Luckily my Saves came through and I only lost one Musketeer but I took some Fatigue.

Near the end of turn 1 I fired my 7 remaining Musketeers and I think I got one kill on the forward Sea Dogs. I was able to shoot off some arrows as well, but the English had no trouble saving and my Poisoned Arrow Fatigue re-roll stubbornly refused to do anything most of the game!

With my Piragua sailing a full 5″ upwind every turn (this is a mistake: somehow I read the windward value as 0″ but in reality it’s -2″. I would have failed even harder), the canoes started to lag a bit. I let the Archer canoe moving under paddle power split off a bit so it could have a clear line of sight to the Sloop.

Guy’s Sloop raced along at 5″ per move and we closed a little as our paths converged.

We continuously exchanged fire through the first 3 turns and I started losing models one or two at a time but my arrows did remarkably little to the stout Englishmen.

I used African Warriors for the Warriors unit. They didn’t have bows but I’m still waiting for Firelock to produce the Warrior unit and this was the best I could do!
The Veteran Freebooters are pretty bad-ass! One of their best attributes is their 6 Shoot Save. Combine that number with the -1 bonus for the Hard Cover and the -3 bonus for saving vs arrows and they only die on a 1. I did get lucky and killed one with an arrow and for a brief moment both units in the forward deck of the Sloop were shaken and prone! My entire strategy centered around dropping large amounts of Fatigue on these deadly units to deprive them of their actions so I wouldn’t get massacred. For a moment it looked like that could be possible.

Then that Grizzled Veteran got rid of most of that Fatigue in one turn, the Sloop pulled a little further away and those back 4 Swivels fired at me again and took out another couple models leaving my Archers shaken.

I soon found myself pushing my units to fire multiple times hoping to apply more Fatigue than I was giving myself but the Poison just didn’t work. I wasn’t killing anything, I was falling behind in my canoes and I was giving my units more Fatigue than they were applying. I had to have the Archers in the back canoe man the Sweeps because they got out of range. They never really caught up again.
I finally got up to to less than 8″ inches away from the Sloop and my Warriors abandoned their Sweeps with the Officer’s action and fired their Sidearm Muskets. I was hoping for a painful volley but I only killed two Sea Dogs and applied zero Fatigue.

Every time the Veteran Freebooters fired it was painful and scary but I either rolled well on my Save or he rolled poorly on his attack. I was losing 1-2 models on every volley and the attrition hurt, but I never had a unit entirely destroyed by a volley from either the Buccaneer guns or the Swivels.
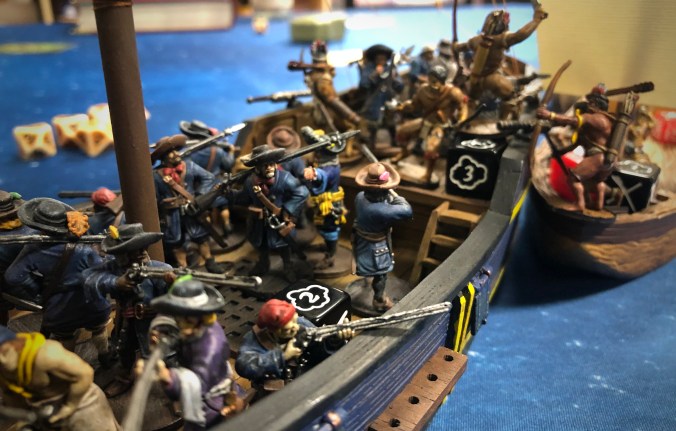
I finally got a high card and caught up with the Sloop long enough to grapple!

With only 5 Archers left and knowing I would be destroyed for doing it, I pushed them to charge into the weaponless Sea Dogs on the rear deck and took out two of them.

With 8 models remaining the Sea Dogs took a dedicated action and massacred all of the Archers on the next activation.
The forward group of 7 Sea Dogs moved through the back of the Sloop and charged into my Piragua and destroyed my command unit and my commander and took control of my Captured Merchant. The Sloop started this activation in the Eye of the Wind and the Sea Dogs were so busy destroying my force they forgot to try to keep control of the ship and it started to drift. This was some good luck for me but the game was basically over anyway.

At the end of turn 4 we calculated Strike Points:
- With more than 50% casualties I had two strike points for my dead, one Strike Point for losing my Merchant and one Strike Point for having my Flagship controlled by the enemy.
- My slow canoe of Archers had seen how the battle was going and with no real chance of catching up and making a real difference, they rowed straight up against the wind and ended turn 4 slightly above the Sloop. With only 5 casualties, Guy’s English Buccaneer only had a single Strike Point for losing the Weather Gauge.
With 3 more Strike Points than my opponent, I took a Strike Test with my Officer attached to the Warriors and just barely passed.

The Warriors paddled on bravely on turn 5 but they couldn’t get close enough to do anything without any ranged weapon. The Veteran Freebooters fired again with the Marksmen shot and got several hits but I got some good Saves and only lost a couple models. At the end of turn 5 I was forced to take another Strike Test with my officer and I failed, mercifully ending the slaughter of the South American Tribes.

The massive, rapid and brutal firepower from the English had really outclassed the Natives.

Of my 32 original models, 21 had been killed and 1 had been captured leaving me 10 models on the board. My casualties added up to around 130 points.

Of the starting 32 Englishmen, I had killed 5 totaling 20 points. It was a massive defeat for the Natives!

Final Thoughts
Force Analysis
- The Natives seem really strong on land but I think they lose most of that power at sea. They seemed totally outclassed here! If my Fatigue engine had started early and Guy had rolled particularly poorly on his Fatigue checks instead of extremely well, I may have had a better chance but between the slower ships, poorer saves, slower muskets, and ineffective bows, I had a rough time of it. Guy played well and kept his volleys coming at me and they wore me down.
- The Veteran Freebooters are good! That 6 Save is worth a lot and they were invincible against my arrows.
- That Privateer Sloop is so fast! I just couldn’t catch up before I was so worn down I didn’t have the slightest chance of being effective in a boarding action. That ship is amazing. It turns out I massively cheated with my Piragua and didn’t apply the -2″ windward value to every move and I still had trouble catching up! I need to run a big cannon list and blow it out of the water. That would feel really good…
- The Poisoned Arrows failed me! I was really counting on them to do a lot more than they did! That English Resolve just wouldn’t break.
- I think I put this in my final thoughts in every battle report but it bears saying again: the Grizzled Veteran is amazing! He is so worth those 3 points. I had 2 Veterans in my force and they kept me going in spite of losing a couple models in that Piragua every turn. My whole strategy revolved around putting Fatigue on that deck with the Veteran Freebooters but the one Veteran on the Sloop basically countered that entire tactic. I got the two units shaken at one point, but with that Veteran, 5 of that 6 Fatigue was removed in once activation.
- I didn’t mention in the report, but the Captured Merchant actually helped a lot. His presence in the Piragua extended the lives of many Natives by at least 20 minutes!
- It’s remarkable that even with paying for Swivels, a larger ship, elite Veteran Freebooters and 3 characters, the English had just as many models in their 200 point list as the Natives. 19 of those models were 3 point Sea Dogs, it’s still kind of crazy! I frittered away a lot of points on upgrades to my units. 10 for the Merchant, 8 for the Officer, 6 for two Veterans, 6 for 2 sets of Poisoned Arrows and 8 for two sets of Sidearm Muskets. All those upgrades seem like they’re worth it but they really add up. That’s 38 points on upgrades for my units not counting the Great Warrior cost and the Veteran upgrade for my Musketeers. I paid 11 for my ships while the English paid 13 for their Privateer Sloop.
Tactical Thoughts
- I could have taken a “prudent” tactic (cowardly) and just rowed my boats straight upwind and tried to give that one scenario Strike Point to the English without engaging at all. At one point part way through the game when I had nearly 2 Strike Points of causalities I could see I wasn’t going to gain the upper hand I considered breaking off the attack and trying to keep the balance at 1 Strike each, but that wouldn’t have been much of a game and with considerably more points worth of casualties, I would have still lost even if we were at 1 Strike Point each.
- In spite of being the “defender,” I felt like I had to close with the Sloop to let my units do anything which kind of made me the attacker. I feel like I’ve been chasing Sloops much too often in my games against Guy and it always hurts! Those 4 Swivels in the back are just not friendly…
- This English list looks very competitive. I’m not sure what would solidly counter it. It can throw 13 Buccaneer Gun dice a turn (and actually fire slightly more than once per turn if you play them right), one pistol die that can actually hit at a surprisingly long range, and 18 Swivel dice with a solid base Shoot of 6. That’s 32 dice a turn out of 32 models! It was painful! Excellent list building on Guy’s part. A heavy cannon list with a solid first broadside could mess that flimsy Privateer Sloop up pretty good, but I’m not sure it would be enough. I would be interested to try a cannon list like this against these murderous English.
Conclusion
Thanks to Guy for a good game! I’ll continue to explore using the Natives at sea but my initial impression is that they are at a large disadvantage compared to most of the other factions at sea. The Natives have some major drawbacks but their special abilities make up for them on land. At sea they lose nearly all those special rules and you are left with mostly weaknesses.
If you’ve used any of the Native factions at sea, please comment and share your experiences! Thanks for reading!

Thanks for the game and the exciting read! I agree with your assessments 100%. I think the Natives should deploy “underhanded” tactics at sea, such as lagging behind, or playing solely towards the objective, because of the disadvantages. No artillery, no size 2 ships, and special abilities that are useless is reason enough. The sloop has been my low point goto, but it is such a fun craft to pilot.
Pingback: South American Tribes – A Faction Breakdown | Blood & Pigment
Pingback: Ship Overview - The Piragua - Blood & Pigment