I got a chance to play a good sized naval game with my friend Guy this weekend and give my newly completed Fluyt a test run.
Summary
- Joseph Forster vs Guy Rheuark
- Armada de Barlovento commanded by Mateo Perez de Garay vs the Royal French Navy commanded by an Experienced Commander
- Fluyt vs Light Frigate
- 350 points per side
- Search and Recover Scenario at Sea
- Using the new rules for cannons
- Played in my kitchen on my perfectly sized 6×5′ island
The Forces
I waffled on which Spanish faction to use several times but I settled on the Armada de Barlovento so I could use Mateo Perez de Garay. This commander seems amazing to me but he’s only available to the Armada. He’s a full 30 points, but he has Very Inspiring, Expert Broadside, Sailing Master, Tough and he gives you a superior version of Heavily Built if you’re using a Fluyt or Galleon. Heavily Built costs 4 by itself which means you’re only paying 26 for those abilities and 3 command points.

Mateo Perez de Garay
With plenty of points to work with I loaded the ship with 6 pairs of medium cannons armed with grapeshot and the full compliment of 6 Swivel Guns. The Fluyt has 2 sets of guns on each deck so I figured the 3 command points and Expert Broadside would be excellent combined with larger cannons. To man the guns I brought 3 sets of 9 Marineros with a Master Gunner in each group and all of them stripped of their pistols.
For Musketry I put a unit of 8 Soldados in the front deck (2 models in the fighting top) with the commander attached and a unit of 10 Inexperienced Milicianos in the rear deck and poop deck with a Grizzled Veteran attached. In the center deck I added a unit of 6 Marineros Piqueros with a Carpenter character attached to keep those critical hits repaired. The Piqueros are solid since they have a 6 save, they can take a Carpenter, and they can make a defensive attack with their lances if boarded.
My total force was 54 models in 6 units. The complete build can be found here.
Guy ran a Light Frigate with 5 guns and 4 units. The front deck had a massive unit of 15 Trained Milices de Caraibes with an Officer, the middle deck contained 12 Veteran Marins with Buccaneer Guns and a Master Gunner and the back deck held two units of 8 Marins, one with the Commander, Master Gunner and a Standard Bearer and the other assigned to Sheets and Braces with a Sailing Master. An approximation of his list can be found here.
The Game
We rolled on the campaign scenario list for a scenario and it came up as Search and Recover. We both had a +4 to our initiative rolls and I rolled high but the role of the defender and attacker is no different in this scenario. We placed 3 objective markers in a 4×4 area and deployed our ships in the corners with the wind at our backs.

With fairly large ships and medium cannons we were basically within cannon range from the first turn.

Starting positions
The French Frigate moved first and let off a long range broadside right away. Two cannons made contact (using the new cannons rules), and one damage got through after the San Pablo’s heavily built hull cancelled one damage. The one damage did a crit on my sheets and shrouds.
I moved the Fluyt up a little (to compensate for the Frigate’s 5 fortitude) before turning into position for a broadside. My cannons made contact and put two damage in his hull and killed one model.

The rest of the turn was spent reloading cannons and moving towards objective markers. I have to say those Master Gunners make cannons more efficient by a huge margin. If you activate on a Heart, the Expert Artillery Crew will give you a free reload, you’ll get two reload actions if your unit is trained then an additional reload from the Master Gunner’s command point. That leaves you entirely reloaded and ready for the Commander to fire another broadside on the next turn.
The French Navy grappled an objective early in turn 2 but it wasn’t the prize. I fired off my cannons in piecemeal during the second turn with minimal effect killing only one more model. At 20+ inches it’s still hard to penetrate that Frigate’s hull. I did score a Lucky Hit which resulted in a destroyed gun (I made a mistake here. It came up as a rigging critical but I re rolled it, forgetting that Expert Broadside only lets you re roll 1’s.).
My carpenter used his command point to help the front deck repair the damaged rigging and I reduced my sail setting to 3 as I approached the rightmost objective.
Guy fired another complete broadside targeting my rigging this time and landed 3-4 damage and a Sails and Spars critical hit as I fished the second useless objective marker out of the water. One of my Soldados in the fighting top is killed as well.

We moved to turn 3 knowing the valuable objective is upwind of both our ships. I had to turn as sharp as possible to get close enough to snag the objective and Guy will be forced to cross the wind’s eye.

The prize is upwind.
This scenario can have a runaway winner if the valuable objective is discovered early. It was fun having both useless objectives eliminated early so we had to race each other to grab the prize.

Turns 3 & 4 were spent navigating against the wind with some long range sniping producing a few casualties and more cannon fire brining my rigging fortitude down to 2.
Guy’s veteran Marins/sailing master manning the sheets and braces aced every single advanced maneuver as he sailed upwind and across the wind’s eye.
As soon as I turned upwind my ship slowed to 1″ per move until I was able to increase my sails to 4″ again. The Fluyt feels like a tub when sailing upwind!
We had a fun moment when I rolled Friendly Rivalry on the Sea Events table and my Milicianos gained the Sailors rule for a turn. They changed my sail setting back up to 4″ for me!

The end of turn 4.
I snagged the objective at the end of turn 3 which gave Guy 1 strike point, then turned out of the wind’s eye and our ships started to close over the course of turn 4.
I was fortunate enough to win the bid for initiate going into turn 5 and my Fluyt lined up and unloaded all 6 medium guns of grapeshot into the French.

Let the grapeshot fly!
24 dice hitting on 6’s or 7’s produced 7 casualties (after some decent save rolls) with the mid deck Marins taking the majority of the casualties. This broadside left the Marins assigned to the 3 midship cannons shaken so the inevitable returning cannon fire wasn’t as devastating as it could have been. The Frigate’s two rear cannons targeted my rigging again leaving me with another lucky hit (which my pro carpenter immediately repaired) and brining my rigging perilously close to being destroyed. The last Soldado in the fighting top was killed and the falling debris killed another which left my commander’s unit shaken.
I was able to shoot all my swivels before our ships passed and I left the Marins assigned to the sheets and braces shaken and too few to reassign to the task. My rear swivels took out a couple French Militia but there were still 12 in the front of that Frigate!
Guy’s French spent the rest of turn 5 picking off a couple models with muskets and rallying the shaken Marins.
With my rigging nearly destroyed I turned to put distance between us at the end of turn 5.

Guy had the first action of turn 6 and with some fine gunnery, he got the last 5 hits he needed to totally destroy my rigging, leaving the Aramda de Barlovento dead in the water. This has never happened to either of us before so we looked to the rulebook to see what happens. We looked all through that book but couldn’t find an answer so we just decided my ship was drifting and could no longer sail.

Not good…
We threw the question out to the Blood & Plunder Facebook group and we got a lot of varying opinions but not any solid answers until Mike Tunez chimed in the next morning. Apparently this doesn’t happen very often…
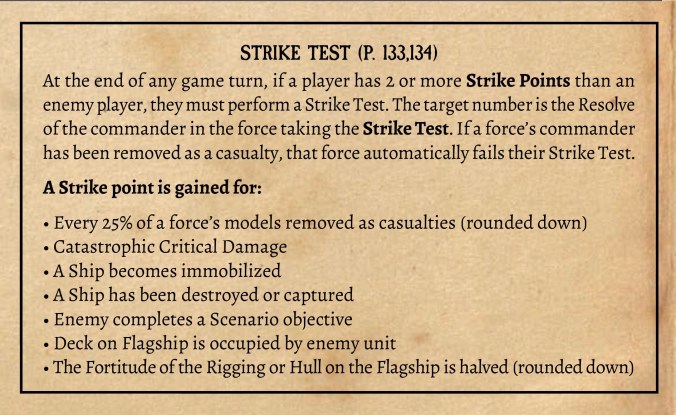
I still don’t feel like the rulebook is clear regarding what happens in this case but apparently we played it incorrectly. I could continue to sail but I had to deal with the several critical hits on my rigging and every time he attacked my rigging again, it would pile on more and more crits which could eventually immobilize my ship. I did get one strike point for losing 50% of my rigging’s fortitude.
The last turn ended without any further drama as both forces pushed to get some final shots off with small arms at extended range.
The game ended without any further casualties. If the game had gone beyond 6 turns I would have been a dangerous position as I moving at only 2″ per turn from my critical hits and the French could have outmaneuvered me and gone for that Broken Mast crit on my poor rigging.

The French Frigate and the game’s end.
Conclusion
- The Royal French Navy had 2 strike points, 1 for 13 casualties (65 points) and 1 for my possession of the objective.
- The Armada de Barlovento had 1 strike point for my rigging’s fortitude falling below 50% and 0 for my 8 casualties (33 points).
We called it a Pyrrhic victory for the Spanish since I had the objective and caused more casualties but if the game had continued things could have gone downhill for me.

My total casualties
Closing Thoughts
We had a great time and, as usual, we picked up some new rules and ideas by the end of the game.
- Characters are both fun and very powerful. At sea the Master Gunner is probably my favorite but the more characters I see in action, the more I’m convinced that they all have huge value when used thoughtfully. This was the first I’d seen both the Carpenter and Sailing Master in action and both of them kicked butt and even the Standard Bearer did serious work. The Officer might seem expensive but it’s his flexibility that gives him value. You win the game by doing things and characters let you do more things and they let you do them better. They make the game more complex but I really enjoy the flavor they add.
- 350 points seems like a “magic number” for building a well-armed 3 deck ship. You can put a lot into a ship for 350 but you can’t get everything which forces you to make decisions as to what you will leave out.
- The new cannon rules are excellent! Making cannons actually hit more often makes the game more fun. I think they deal about the same amount of damage but they are just more consistent. It can be a “feel bad” moment if you maneuver into position and use all your command points to fire your broadside only to not get any hits at all. That’s happened to me several times and it can spoil a game. You can find the new cannon rules on page 188 of the No Peace Beyond the Line rulebook.
- The historical commanders are a lot of fun. Some of them might be hard to totally justify their point value if you’re going to be ultra competitive but they provide flavor to the game which makes it fun. Any commander with 3 commander points can really have a decisive turn in a battle. You can do so much in one activation and sometimes that’s what wins a battle. I think Mateo Perez De Garay is worth ever point!
- I haven’t ever controlled one but I consider the Light Frigate the best all-purpose ship in the game. It’s durability, speed, deck sizes and 3-cannon mid section are all really strong. The Fluyt seems good but the Frigate’s 5 Fortitude is so helpful.
- This was the least bloody game of Blood & Plunder I’ve played. I only lost 8 of 54 models! I’ve been playing a lot of land battles lately and they have been racking up a high casualty count. This game felt so much different.
- Don’t let your rigging get destroyed. It’s a little rough…

Thanks to Guy for a good game!
Yeah, definitely a narrow Spanish victory!!! Excellent battle report, and interesting to learn about the rigging…
Pingback: Standard Game Size | Blood & Pigment
Pingback: Battle Report – Dutch Royal Navy vs Armada de Barlovento | Blood & Pigment
Pingback: Armada de Barlovento – A Faction Breakdown | Blood & Pigment
Pingback: What Should I Buy After the Blood & Plunder Starter Box?